Shopping Cart
This resource covers the process of navigating to the Shopping Cart, finding and adding classes, and enrolling directly from the Shopping Cart.


Introduction
Shopping Cart in MyBU Student is a space where desired classes can be saved and ready for the time enrollment opens. This resource outlines how to add classes and sections to the Shopping Cart and how to enroll directly from the Shopping Cart once the appropriate enrollment period opens.
Refer to the following resources for information related to enrollment:
- BU Registrar website: For calendar of registration dates and information on enrollment appointments.
- View Enrollment Dates: How to see enrollment appointments in MyBU Student.
- Enrollment Messages: Overview of possible conflict and issue messages that may be encountered during enrollment functions in MyBU Student.
For further information on enrollment appointments or class permissions, please refer to department policies and communications. Additional resources are linked at the bottom of this page.
⚠︎ Screen options and menus will vary by user; please note that displays may differ for you based on access that has been granted. All screens shown are for training purposes only.
Add Classes to Shopping Cart
Classes can be added to the Shopping Cart from the Class Search or Schedule Builder pages, or directly in the Shopping Cart page. This section will outline adding classes directly within the Cart and the available pre-registration options within the page.
NOTE: The Shopping Cart page will be blank if no classes have been added. If classes have been added, the following steps can also be used to add more courses to the Shopping Cart.
- To add a class from the Shopping Cart page, ensure the proper Term has been selected, click the Add Class button, and then Add by class number.
- Selecting either Class Search or Schedule Builder from the Add Class button will navigate to their respective pages so classes can be added from there.

- Enter the Class Number and click Add.

TIP! Only the exact class number can be used to add a class directly. The Class Name and Section Number are not accepted in this window. Refer to the Class Numbers Explained resource for guidance on these numbers.
- If the addition of the class was successful, a confirmation message will appear in the top right corner of the page that displays the class number.

Repeat these steps as many times as necessary to add the desired classes to the Shopping Cart.
Manage Shopping Cart
Once classes have been added to the Shopping Cart (directly from the Shopping Cart page, or from Class Search or Schedule Builder), there are number of actions available before enrollment opens.
Refer to the following image throughout this section:

- Search: enter criteria to search the classes that are in the cart.
- Schedule: launches a calendar (or list) view of the classes that have been enrolled (or waitlisted) for a particular term.
- Clicking Schedule on this page will open the Schedule tab in the Dashboard left menu. To return to Shopping Cart, navigate to Enrollment > Shopping Cart.
- Course & Section Number: click on a class row to view additional class details such as Career, Session, Units, Grading Basis, Full Description, Attributes, Instructor, Start & End Dates, Meet Times, Instruction Mode, Room, Campus, Location, Components, Textbooks/Course Materials and Availability.
- Class select checkbox: if one or more class checkboxes are selected, the following action buttons become available in the upper right corner of the page:
- Three dots menu: click to view additional actions for a listed section. Actions that will display before enrollment period has opened:
- Edit: this is currently not being used.
- View Deadlines: in addition to class details, the Academic Calendar Deadlines such as drop, cancel, and withdrawal dates will display.

- View course materials: opens an external link to the BU Campus Store and displays information about required course materials, if available.
When the appropriate enrollment period has opened, classes may be enrolled directly from the Shopping Cart.
TIP! Keep in mind that it’s possible for new conflicts to arise between the time that the validation process is run in the Shopping Cart and class registration. Be prepared for the additional validation that will always occur at the time of registration.
Enroll from Shopping Cart
If the assigned enrollment period has opened, registration can occur from the Shopping Cart page.
- Navigate to the Shopping Cart page from either:
- the Dashboard left menu: Enrollment > Shopping Cart.
- the Shopping Cart section of the Dashboard. See the “Start Shopping Cart” section above for complete navigation steps.
- Once the desired class has been identified in the page, there are two ways to register:
- Click the three dots to access the Actions menu, then select Enroll.
- Check one or more class selection check boxes, then click the Enroll button that activates in the top right corner of the page. This option allows for registration in multiple classes at once.

- Review the Agreement pop-up and click Enroll when ready to enroll in the selected course(s).

- An Enrollment Results message will display.
- If there are conflicts or issues, that Error information will be listed with the relevant class.

The Error example above illustrates a hold on a student’s record that must be removed before enrollment can occur. For other examples of potential conflicts and messages that could be encountered, see the Enrollment Messages resource.
- If enrollment was a success, the class will be listed with a message indicating it has been Added to Your Schedule.

- Click OK to exit the Enrollment Results window.
NOTE: If the validation process was run previously in the planning phase of using Shopping Cart or Schedule Builder, keep in mind that it is possible for new conflicts to arise between that time and class registration. An additional validation always occurs at the time of registration.
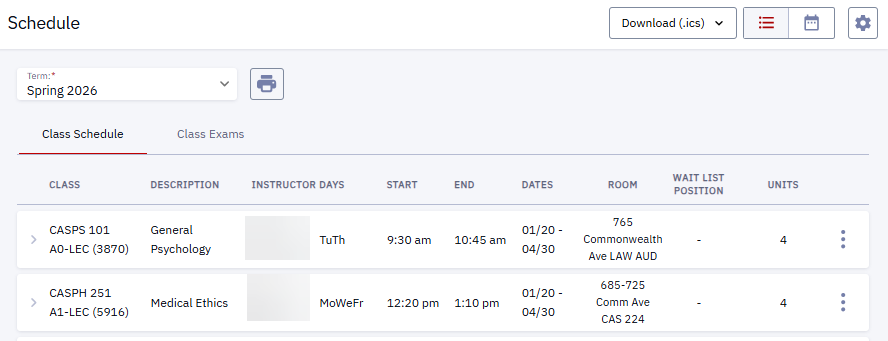
CONFIRM ENROLLMENT WITH A SCHEDULE
- In the MyBU Student Dashboard, navigate to the menu and select Schedule.
- A Calendar View of the current schedule will open.
- Choose preferred Time Period view: Month, Week, or Day.
- Click directly on a class to see more details.
- Choose to display enrolled classes, waitlisted classes, or both by selecting/deselecting checkboxes.
- Click Download to save a digital file.
- Click the printer icon to Print the schedule.

- Toggle the view icons in the top right of the window to switch between Calender view and List view. In List view:
- Click on a class to expand to see more details.
- Download or Print the Schedule from the List view.

Related Resources
The following links provide further details about concepts and actions explained on this page:
Page last updated April 2026. To download a PDF copy of this resource, print this webpage as a PDF. Other resource formats can also be accessed via the relevant icons below.