Schedule Builder
This resource covers the process of navigating to Schedule Builder, building and evaluating different schedule options, and enrolling directly from Schedule Builder.
![]()
![]()
Introduction
Schedule Builder in MyBU Student allows for the compilation of various schedule permutations to determine what options might be preferred for enrollment.
This resource outlines how to input courses and sections into Schedule Builder, manage those built schedules through various available actions, and enroll from Schedule Builder pages directly once the appropriate enrollment period opens.
Refer to the following resources for information related to enrollment:
- BU Registrar website: For calendar of registration dates and information on enrollment appointments.
- View Enrollment Dates: How to see enrollment appointments in MyBU Student.
- Enrollment Messages: Overview of possible conflict and issue messages that may be encountered during enrollment functions in MyBU Student.
For further information on enrollment appointments or class permissions, please refer to department policies and communications. Additional resources are linked at the bottom of this page.
⚠︎ Screen options and menus will vary by user; please note that displays may differ for you based on access that has been granted. All screens shown are for training purposes only.
Start Schedule Builder
- Login to MyBU Student and access the Dashboard.
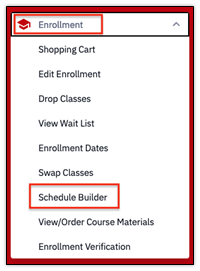
- In the left menu, navigate to Enrollment and then Schedule Builder.
- The Schedule Builder message page will open. Review the message for the most recent information.
- Click Continue to proceed to Schedule Builder.
- Click View Tips to walk through the help tips within Schedule Builder. Tips can also be reviewed directly from the Schedule Builder page.
- Select the Skip this message in the future checkbox to bypass this message the next time the Schedule Builder page is accessed.
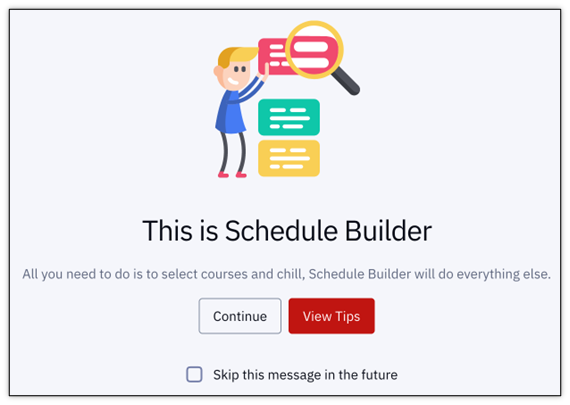
NOTE: Even if the Skip box has been checked, a message may display when next accessing Schedule Builder because new information distributed at various times throughout the academic calendar may be available for review.
- Schedule Builder will open.
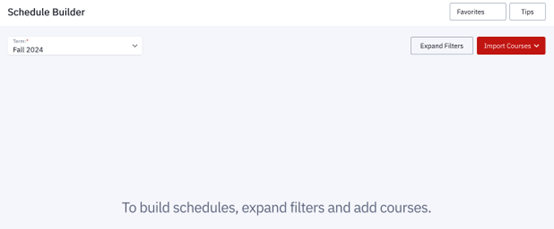
- Schedule Builder view when no classes have been added yet:
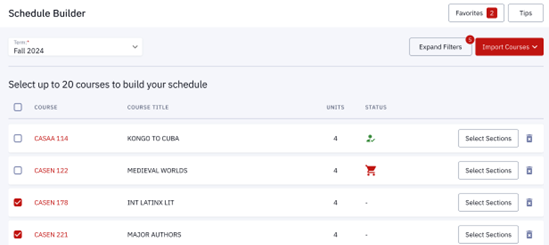
- Schedule Builder view when classes have already been added:
- Schedule Builder view when no classes have been added yet:
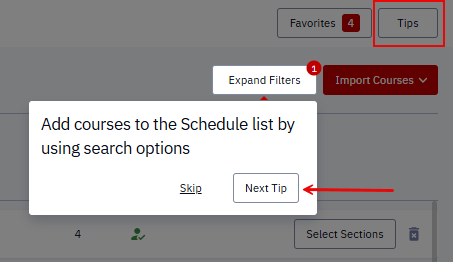
- Click the Tips button in the top right corner to view help tips for filtering. Continue through the help messages by clicking Skip or Next Tip.
Add Classes to Schedule Builder
Classes can be added to Schedule Builder through two methods:
- from the Class Search page (see the Class Search resource for instructions)
- directly within a Schedule Builder page.
This section outlines adding classes directly within Schedule Builder and the available pre-registration options within the page.
- Select the appropriate Term.
- Classes can be imported by selecting the Import Courses button:
- Enrollment: select this option if there are classes that have already been enrolled in for the selected term. If the appropriate enrollment period has not opened yet, then there would be no classes to import using this option. See the View Enrollment Dates resource for more information.
- Shopping Cart: any classes previously added to the Shopping Cart can be automatically added here. See the Shopping Cart resource for guidance.
- Wait List: wait lists will be available for some academic areas; any classes on an available wait list can be automatically added here. See the Class Status & Wait Lists resource for more information.
- To add classes individually, click the Expand Filters button to enter search criteria.

- A window of filtering options will display for finding classes to add to Schedule Builder.
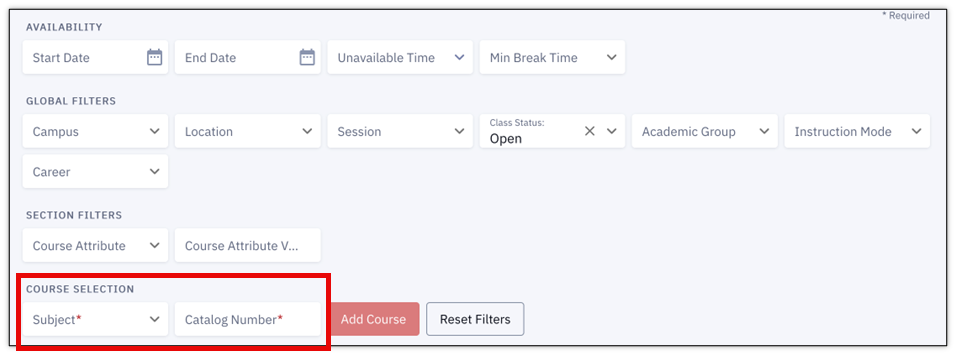
- The only required fields in the filter options are Course Subject and Catalog Number. (E.g., ENKEG 103, CASCH 218). For help understanding these numbers, review the Class Numbers Explained resource.

- Proceed to the “Set Filters” section below for instructions on setting other filters.
- The only required fields in the filter options are Course Subject and Catalog Number. (E.g., ENKEG 103, CASCH 218). For help understanding these numbers, review the Class Numbers Explained resource.
- The course description will appear once the course has been selected.
- Click Add Course to add to the list at the bottom of this Schedule Builder page.
- Click Reset Filters to start over with new criteria.

SET FILTERS
Refer to the next image while proceeding through the Availability, Global Filters, Section Filters, and Course Selection instructions below. Use these filters to narrow down the search performed in Step #4 above.
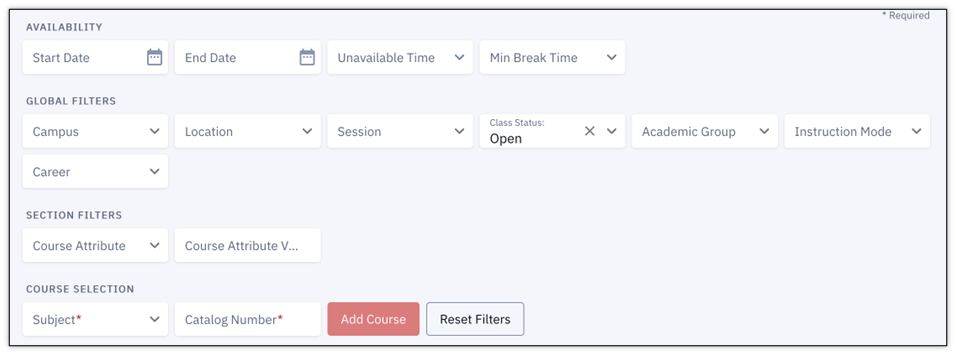
- Availability: Enter times to block off in the schedule.
- Start/End Date: select dates where these blocks apply.
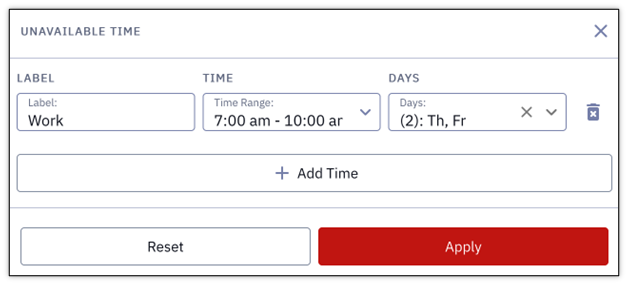
- Unavailable Time: define a period that will not be free for a class. In the window that opens:
- Type a Label name for the block (e.g., Work, Studying, Gym), then use the drop down menus to select Time Range and Days for each block of unavailable time.
- Multiple blocks can be added by clicking the +Add Time button.
- Click Apply when finished or Reset to start over.
- Min Break Time: define an amount of time that will automatically be included between classes (e.g., for traveling between classes in different locations).
- Global Filters: Enter criteria to narrow down the options that can be selected in the Course Selection fields at the bottom of the page. Any criteria entered will also apply to classes at the time of clicking the Build Schedule button (explained further down this page).
- Campus: select Boston University.
- Location: click the drop-down menu to select a campus location.
- Session: click the drop-down menu to specify a regular or dynamic session.
- Class Status: select to narrow down classes that are open or closed.
- Academic Group: identify the school or college.
- Instruction Mode: specify In-Person or Online methods.
- Career: select the Career category (e.g., Undergraduate, Graduate, Law, Medicine, Dental).
- Section Filters: Enter criteria to narrow down the options that can be selected in the Course Selection fields at the bottom of the page. Any criteria entered will also apply to classes at the time of clicking the Build Schedule button (explained further down this page).
- Course Attribute: click the drop-down menu to specify a type or category of course (e.g., Hub).
- Course Attribute Value: select a specific value for the Course Attribute type identified (e.g., specific Hub requirement).
NOTE: Criteria entered in the Global and Section Filters do not function as a broad search to trigger a list of results (as seen in the Class Search page). The list that appears on this page will only include specific classes that are either:
- Entered directly in the Course Selection fields on this page, or,
- Added from the Class Search page.
Courses that don’t meet the criteria added from the Class Search or imported will still display in the list on this page – they will just be met with an error message at the time of building the schedule.
- Course Selection: These are the only fields that must be entered in order to add classes directly within Schedule Builder. The previous filters help narrow down these options; they do not need to be entered as prerequisites to indicate the course selection. (E.g., ENKEG 103, CASCH 218).
- Subject: enter directly or click the drop-down menu to indicate the specific area of instruction. Available options are impacted by the filters already defined above.
- Catalog Number: enter a number and subject code identifying a course.
Build Schedules
The list of classes on the Schedule Builder page, shown below, will be a compilation of any classes imported or added individually within this page, or from the Class Search page. Please note:
- A maximum of 20 courses can be selected when building the schedule (there may be more listed).
- Status icons will indicate if a class has been added to the Shopping Cart (red icon) or Enrolled (green icon).
- Click the Trash icon to delete a course from the Schedule Builder list.
- The number of Total Units will be indicated below the list.
- A list can be Saved and returned to later.
Refer to the following image throughout the numbered steps in this section:

- Click on the Course or the Select Sections button to view additional details and manage course section choices.
- The full course description will display, as shown in the image below. Click the drop down on the Section Number to view even more information.
- Identify an Attribute or Instructor to narrow down the sections that are listed on this page.
- Indicate if the Global Filters from the Schedule Builder page should be applied to the sections that are available.
- If toggled off, all sections will display including any sections that were filtered out previously. These filters will still apply when the schedules are generated.
- Select the checkbox(es) for the desired sections to be included in the schedule build. None, one, or multiple sections can be chosen.
- Click Ok to return to the main Schedule Builder page.

- Select the checkbox(es) for the courses to be included in the schedule build.
- These selections can also be utilized to remove courses from the list; click the Delete Selected button to perform this.
- Click Build Schedule.
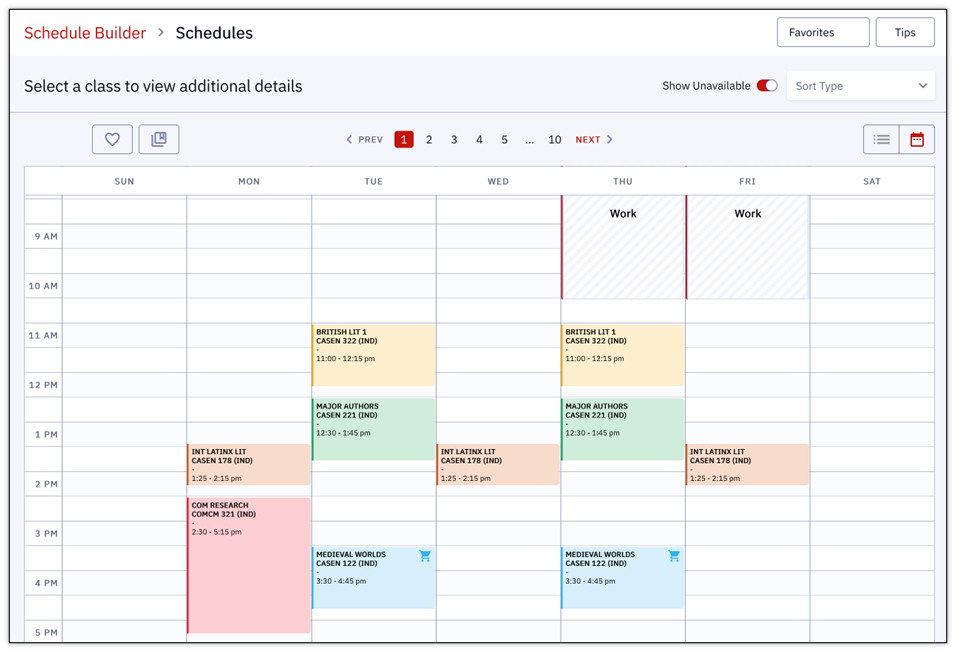
- The schedule(s) will display. There could be multiple possible schedule permutations based on the classes, sections, and filters indicated. Click through the different schedules using either the Previous and Next arrows or page numbers at the top of the calendar display, as shown below.

- If more than ten schedules can be generated, a message will pop up, indicating only the first ten schedules will be displayed. Click View Tips to return and re-compile with different selections or Not Now to continue with the ten schedules provided.
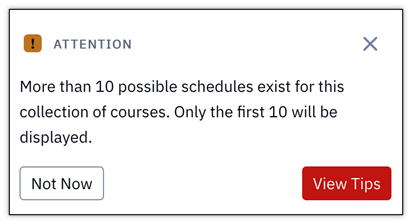
- If more than ten schedules can be generated, a message will pop up, indicating only the first ten schedules will be displayed. Click View Tips to return and re-compile with different selections or Not Now to continue with the ten schedules provided.

POSSIBLE CONFLICTS/ISSUES
Classes that conflict with defined unavailable times or filters will be communicated after pressing the Build Schedule button in the class list page (see Step #3 above). A message will display in the top right corner and under the course it applies to.
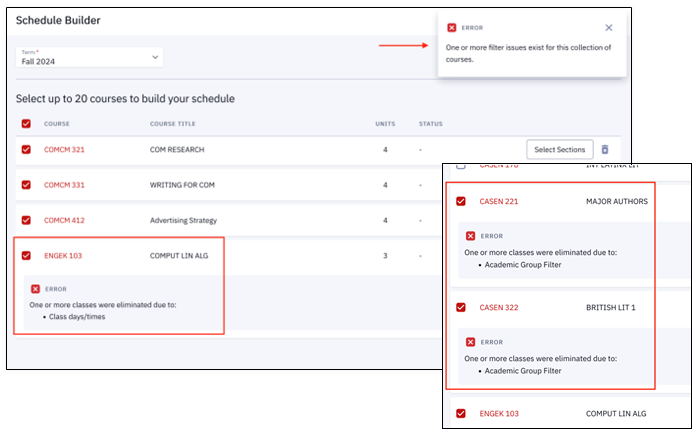
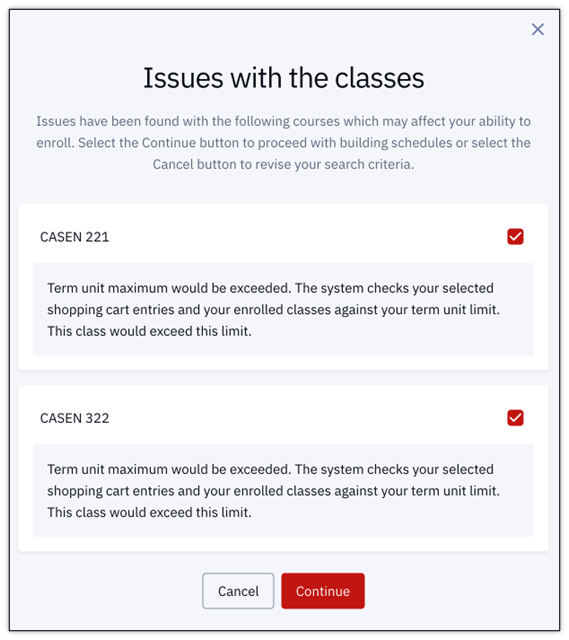
Additional messaging may display providing information on issues not related to filters, such as reaching the number of units allowed (as in the example below).
- Click Continue to move onto the schedule build anyway.
- Click Cancel to go back and make different selections.
- Deselect a checkbox to not include that class in the schedule build.
The above examples are not exhaustive of all conflicts that occur while using Schedule Builder. For more information, please refer to the Enrollment Messages for Conflicts & Issues resource.
Manage & Review Schedules
Once the schedule(s) have been generated, there are many actions available to manage and evaluate them. Actions are provided at the top of the Schedule Builder class list page.
Refer to this image while reviewing the actions list below:

- Schedule Builder: click the link in the top left corner to return to the main Schedule Builder page to redefine filters or choose courses.
- Schedule Page Navigation: click the page numbers, arrows or Prev/Next buttons to navigate between the schedule variations. This is how each schedule can be reviewed to see which version is preferred.
- Tips: click to view help tips specific to this page.
- Show Unavailable: toggle to remove blocks that display because of unavailable times defined. This refers to settings in the Availability Filters on the previous filters page (see “Add Classes” section above, under “Set Filters.”).
- Sort Type: reorder the schedules based on a preferred method (e.g., earliest or latest average start time, most or least days scheduled).
- Favorite icon: click the heart icon button in the lower left (highlighted in the image above) to add a schedule as a Favorite (explained below).
- Favorites button: in top right corner; opens a menu of all the Favorite schedules the student has created (explained below).
- Compare icon: click the stacked pages icon button in the lower left (highlighted in the image above) to add a schedule for comparison (explained below).
- List/Calendar: toggle between the list and calendar icons (highlighted in the image above) to switch between schedule displays; the Calendar view, with class blocks, is the default.
REVIEW SCHEDULES
The default Calendar view displays multiple details that can be used for reviewing schedules. Refer to the image below while reviewing the list of Calendar display details:
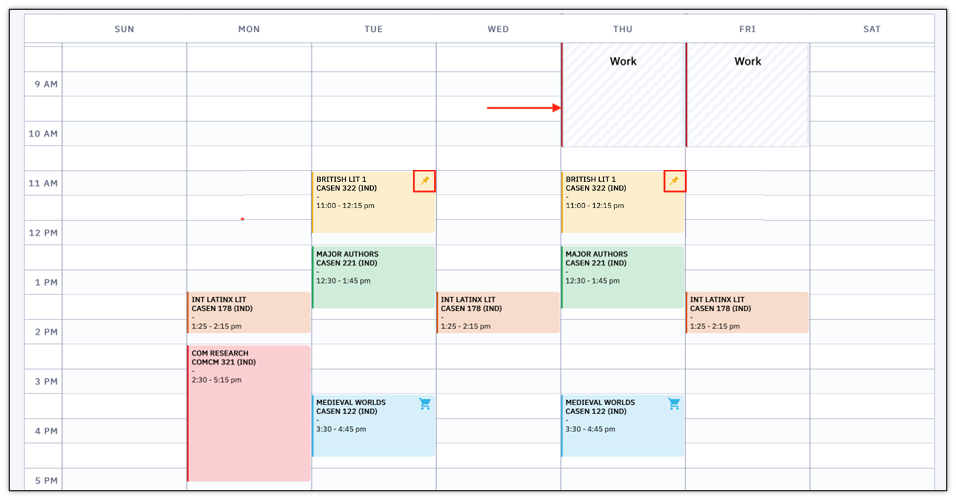
- Unavailable Blocks: Times that the student defined as unavailable in the Availability Filter display as grayed-out blocks on the calendar.
- If the Show Unavailable setting is toggled off, these blocks will not display in the schedule.
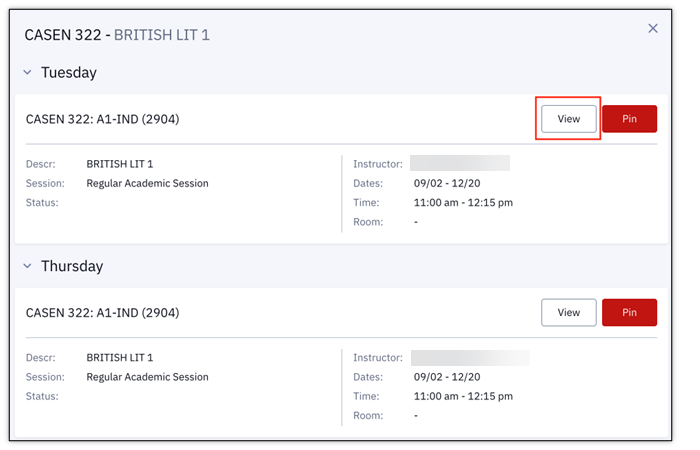
- Class Blocks: Click directly on a class to view additional details. Clicking on a Class Block in the schedule displays the meeting days and times for a class.
- Click View button to open a pop-up window of the full course description information.
- Click Pin button to indicate that each provided schedule must include that class. (also see image above for examples of pinned class blocks in Calendar view).

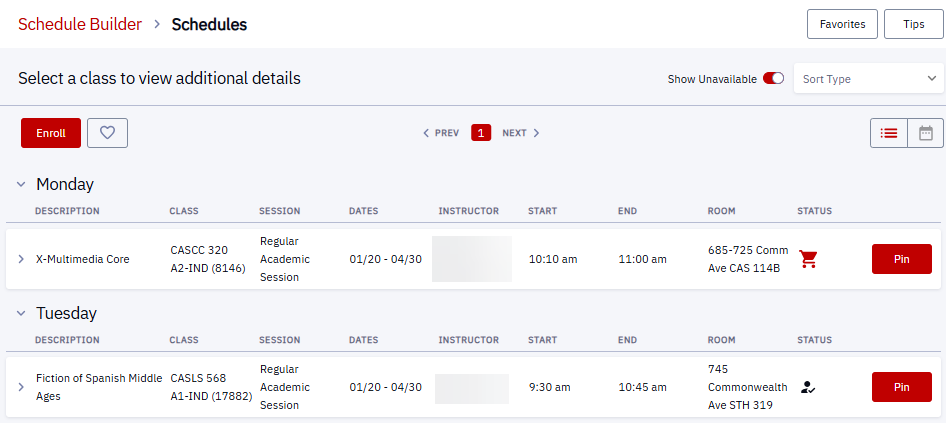
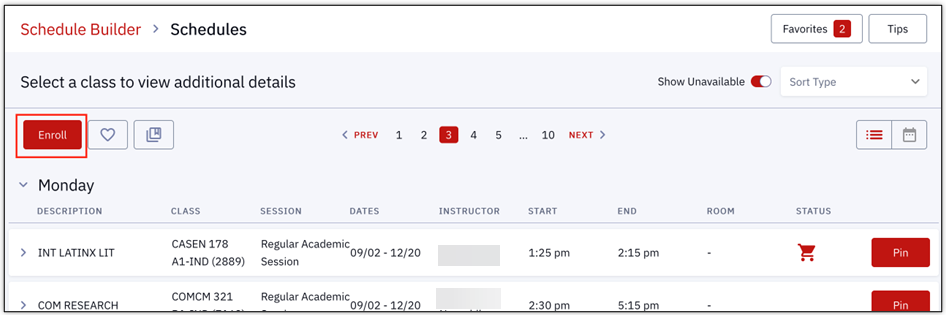
To review schedules in the Schedule List View:
- Use the toggle in the top right of the schedule page to switch from Calendar to List.
- Click the arrow on a class row to view a full course description.
- Click the Pin button to indicate schedules should include that class:

FAVORITES
Favorites allow for a schedule version to be saved and easily accessed later. It won’t need to be rebuilt again.
To save a schedule variation as a Favorite:
- Click the Favorite icon (heart button) on the top left of that schedule page.
- Enter a Schedule Title and click Confirm.
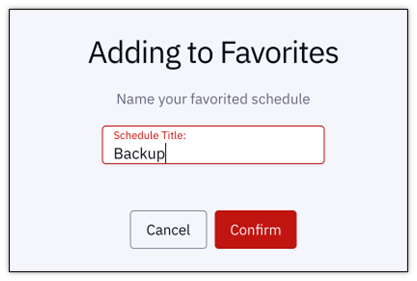
- A success message will display in the top right corner.
- To view the schedules that have been marked as favorites, click the Favorites button at the top right of the Schedules page.
- A number indicator will display on this button to see at a glance how many schedules have been favorited.

- A number indicator will display on this button to see at a glance how many schedules have been favorited.
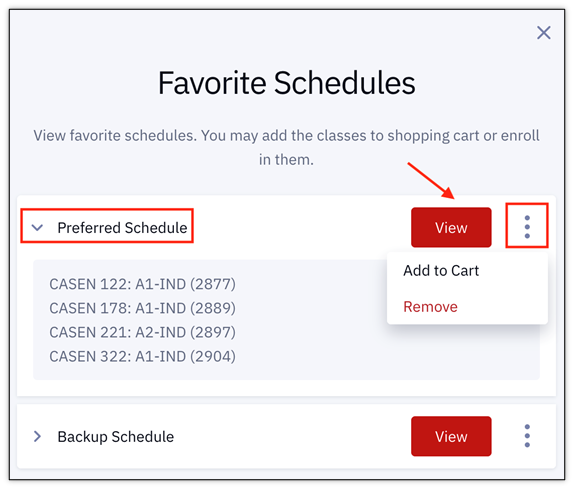
- Information on all Schedules that have been marked favorites will display.
- Click on the Schedule name to view the list of classes included in that schedule.
- Click the View button to open the full visual of the favorited schedules and rename a schedule if preferred.
- Click the three dots menu to open options to Add to Cart (adds that entire schedule to the Shopping Cart) or Remove (or delete) a favorite schedule from the list.

COMPARISONS
To visually compare multiple schedules:
- Click on the Compare icon (stacked pages button) on each schedule page to be included in the comparison.
- A Compare button will appear at the top of the page with a number indicator showing how many schedules have been selected for comparison. Click the button to perform the comparison.

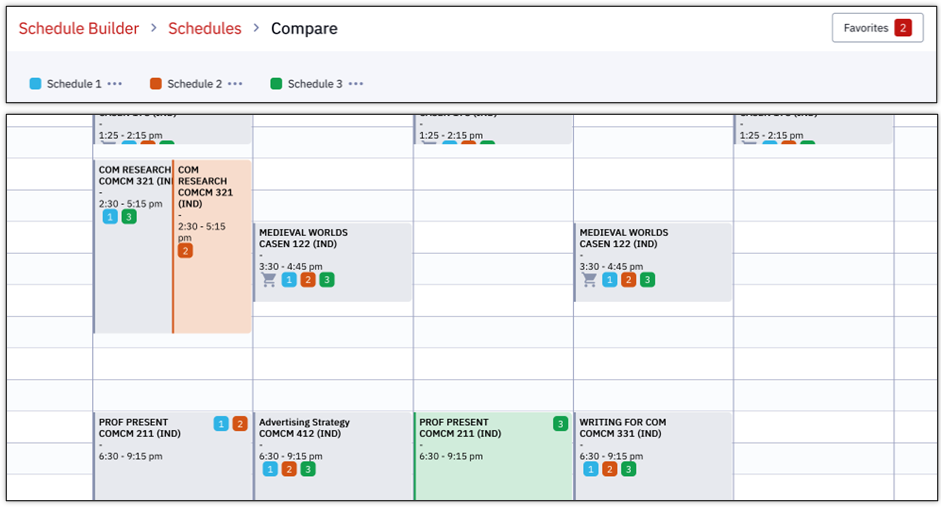
- A Calendar view of the comparison will display. Each schedule included is color coded. In the example below, Schedule 1 is coded with a blue square, Schedule 2 with red, and Schedule 3 with green.

In the above example, notice that the three schedules share similarities. However, differences can be quickly reviewed by clicking on the class blocks for more information (e.g., the two options for COMCM 321 that appear to meet on the same day/time are taught by two different instructors).
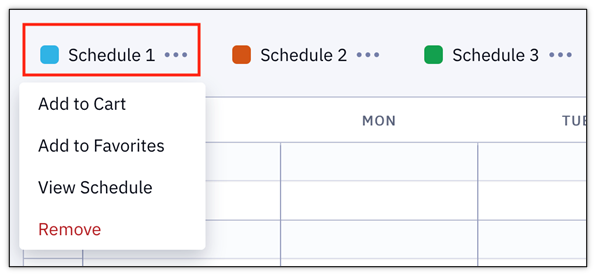
- Click on a Schedule name to open a drop-down menu of actions.
- Add to Cart: adds that entire schedule to the Shopping Cart.
- Add to Favorites: adds that schedule version to the list of favorites (see above for additional steps).
- View Schedule: launches to the calendar view on the Schedule page, leaving the Compare page.
- Remove: deletes schedule from the comparison.
- To return to the Schedules page, click Schedules at the top of the page.
- Clicking Schedule Builder will return to the original filter selection page.
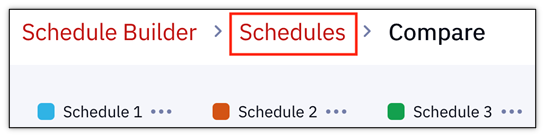
- Clicking Schedule Builder will return to the original filter selection page.
- A Calendar view of the comparison will display. Each schedule included is color coded. In the example below, Schedule 1 is coded with a blue square, Schedule 2 with red, and Schedule 3 with green.
Enroll from Schedule Builder
If the assigned enrollment period has opened, registration can occur from the Schedule Builder page. See the previous sections – Add Classes to Schedule Builder, Build Schedules, and Managing and Reviewing Schedules – to review the steps needed for generating schedules.
- Navigate to the generated schedules from the Dashboard left menu: Enrollment > Schedule Builder > Build Schedule.
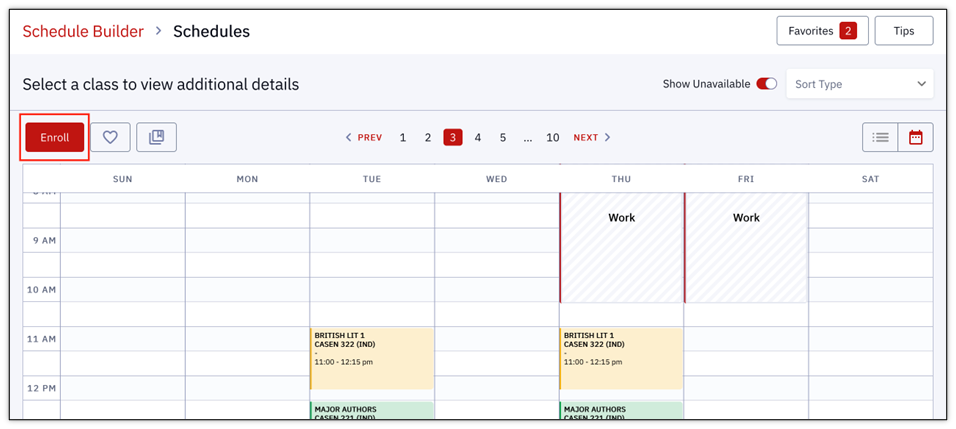
- On the preferred Schedule page, select Enroll.
- Enroll button in Calendar view:

- Enroll button in List view:

- Enroll button in Calendar view:
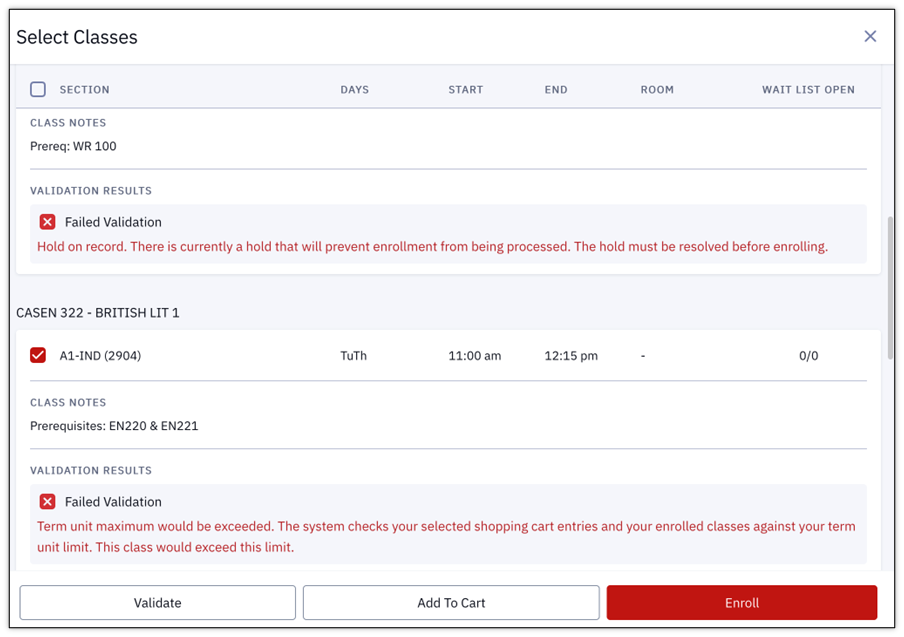
- The classes within that schedule will display for selection on a page titled, Select Classes (shown below).
- Choose all, or specific classes, to be included in the enrollment by checking the box(es).
- Validation can be performed before enrollment; click the Validate button to do so.
TIP! This step may help to resolve any issues before the registration period opens.
- Validation will still occur at the moment of registration regardless of checks being run beforehand.
- Classes can also be Added to the Cart from this page.

- If there are issues, a Failed Validation note will appear under the class that needs attention.

- If ready to register for classes, click Enroll.
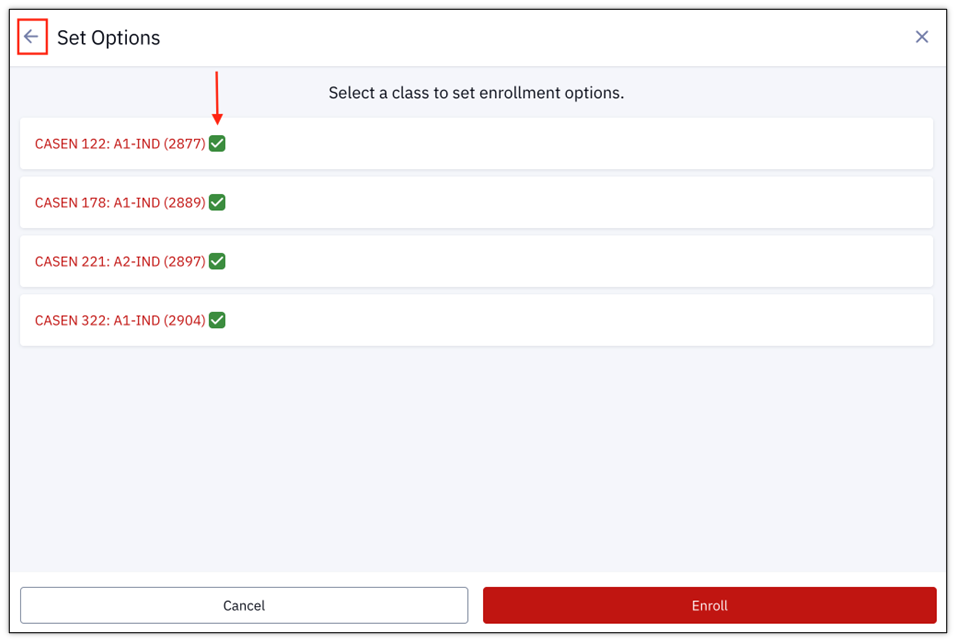
- An additional page will display, titled Set Options (shown below).
- Click each class to include in the enrollment – a green check will appear.
- To return to the Select Classes page to change which classes are included, click the Back Arrow.
- The Enroll button will become available once each class has been selected and is displaying a green check mark.
- The Enroll process will go through validation.

- The Enroll process will go through validation.
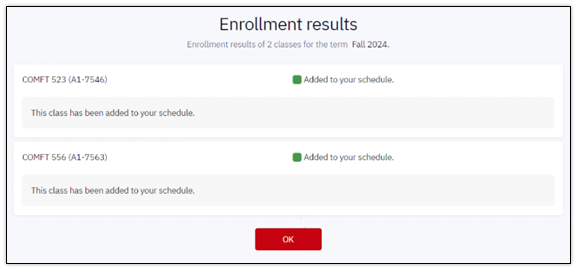
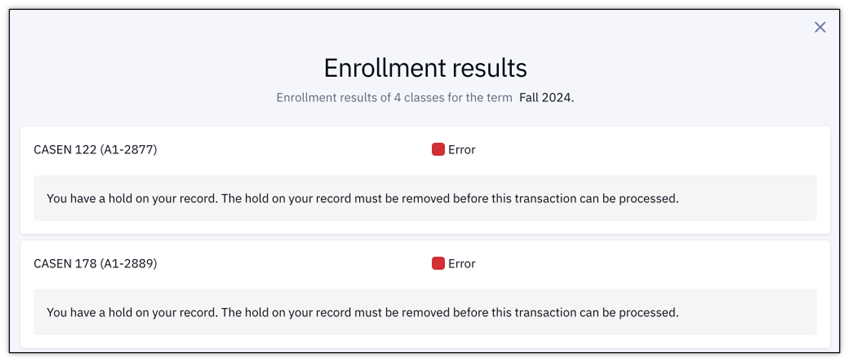
- A message will display, titled Enrollment Results.
- If there are conflicts or issues, that Error information will be listed with the relevant class.

- If enrollment was a success, the class will be listed with a message indicating it has been Added to Your Schedule.
- If there are conflicts or issues, that Error information will be listed with the relevant class.
- Click OK to accept the results and exit the Enrollment Results window.

For more information on potential conflicts and messages that could be encountered, please refer to the Enrollment Messages resource.
ENROLLING FROM FAVORITES
The Favorites page in Schedule Builder can also be used for registration. Refer to the “Manage & Review Schedules” section above to review the steps needed for adding schedules to Favorites.
- Navigate to a Favorite Schedule: Enrollment > Schedule Builder > Favorites.
- Click View on the desired schedule to enroll.
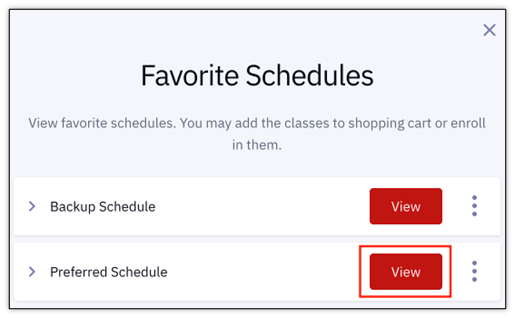
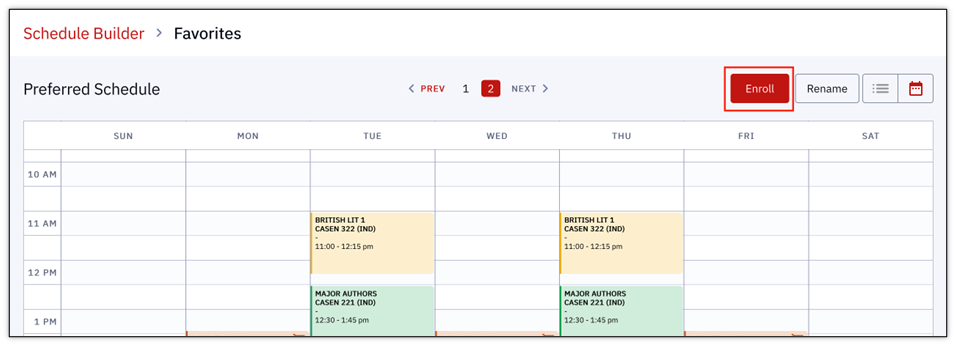
- The favorited schedule page will open. Click Enroll to continue with registration.
- From here, follow the same enrollment process listed above, picking up from Step #3.

- From here, follow the same enrollment process listed above, picking up from Step #3.
CONFIRMING ENROLLMENT WITH A SCHEDULE
- In the MyBU Student Dashboard, navigate to the menu and select Schedule.
- A Calendar View of the current schedule will open.
- Choose preferred Time Period view: Month, Week, or Day.
- Click directly on a class to see more details.
- Choose to display enrolled classes, waitlisted classes, or both by selecting/deselecting checkboxes.
- Click Download to save a digital file.
- Click the printer icon to Print the schedule.

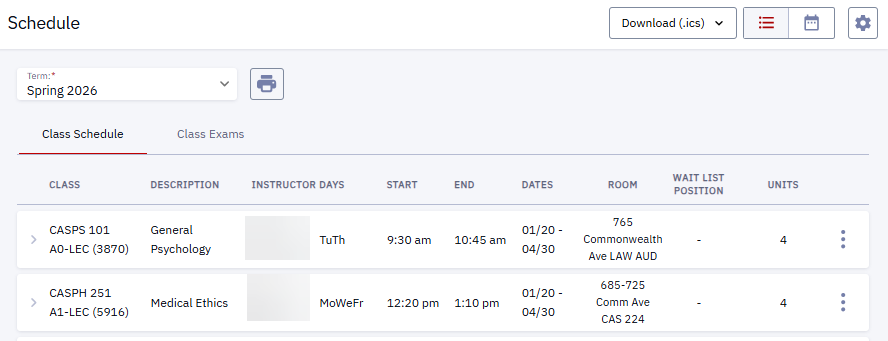
- Toggle the view icons in the top right of the window to switch between Calender view and List view. In List view:
- Click on a class to expand to see more details.
- Download or Print the Schedule from the List view.


Related Resources
The following links provide further details about concepts and actions explained on this page:
Page last updated April 2026. To download a PDF copy of this resource, print this webpage as a PDF. Other resource formats can also be accessed via the relevant icons below.
![]()