Adding and Updating Financial Aid Checklist Items
This information describes how to view and add and/or update a Financial Aid checklist item for a student.

Introduction
In MyBU Student, a Checklist combines assigned and completed To Do items, allowing students to track various requirements. For the purposes of Financial Aid, these items are assigned to a student pertinent to their aid application and/or eligibility.
Common Financial Aid checklist items include the FAFSA, CSS PROFILE, income verification documentation, supplemental forms, and direct loan requirements such as entrance counseling and master promissory notes. In some cases, students can upload forms directly to the Checklist in MyBU Student. As items are submitted and processed, the status of the item will be updated accordingly on the Checklist.
Some assignment and processing of Checklist items will occur automatically in the system. However, authorized staff may manually assign and/or update Checklist items for a student as needed.
Please note that this resource includes information related to Federal Financial Aid policies which are liable to change. Staff maintaining this documentation will update terminology, links, or processes in accordance with new information as it becomes available in conjunction with Student Information System updates. The information here identifies salient details regarding the usage of MyBU Student and is designed to be used in conjunction with Financial Aid Procedures and Processes.
A resource for students on Financial Aid Checklists is available here. (This resource is also available to students as a knowledge article in their student portal.)
⚠︎ Screen options and menus will vary by user; please note that displays may differ for you based on access that has been granted. All screens shown are for training purposes only.
View a Student's Checklist
Financial Aid staff can view a student’s currently assigned Checklist items in two ways:
- View Financial Aid Status page
- Act As User
ⓘ NOTE: The Financial Aid Status page allows staff to view Checklist items for a specific Aid Year. The student/Act As view will show Checklist items from all applicable Aid Years.
To view Checklist using the View Financial Aid Status page:
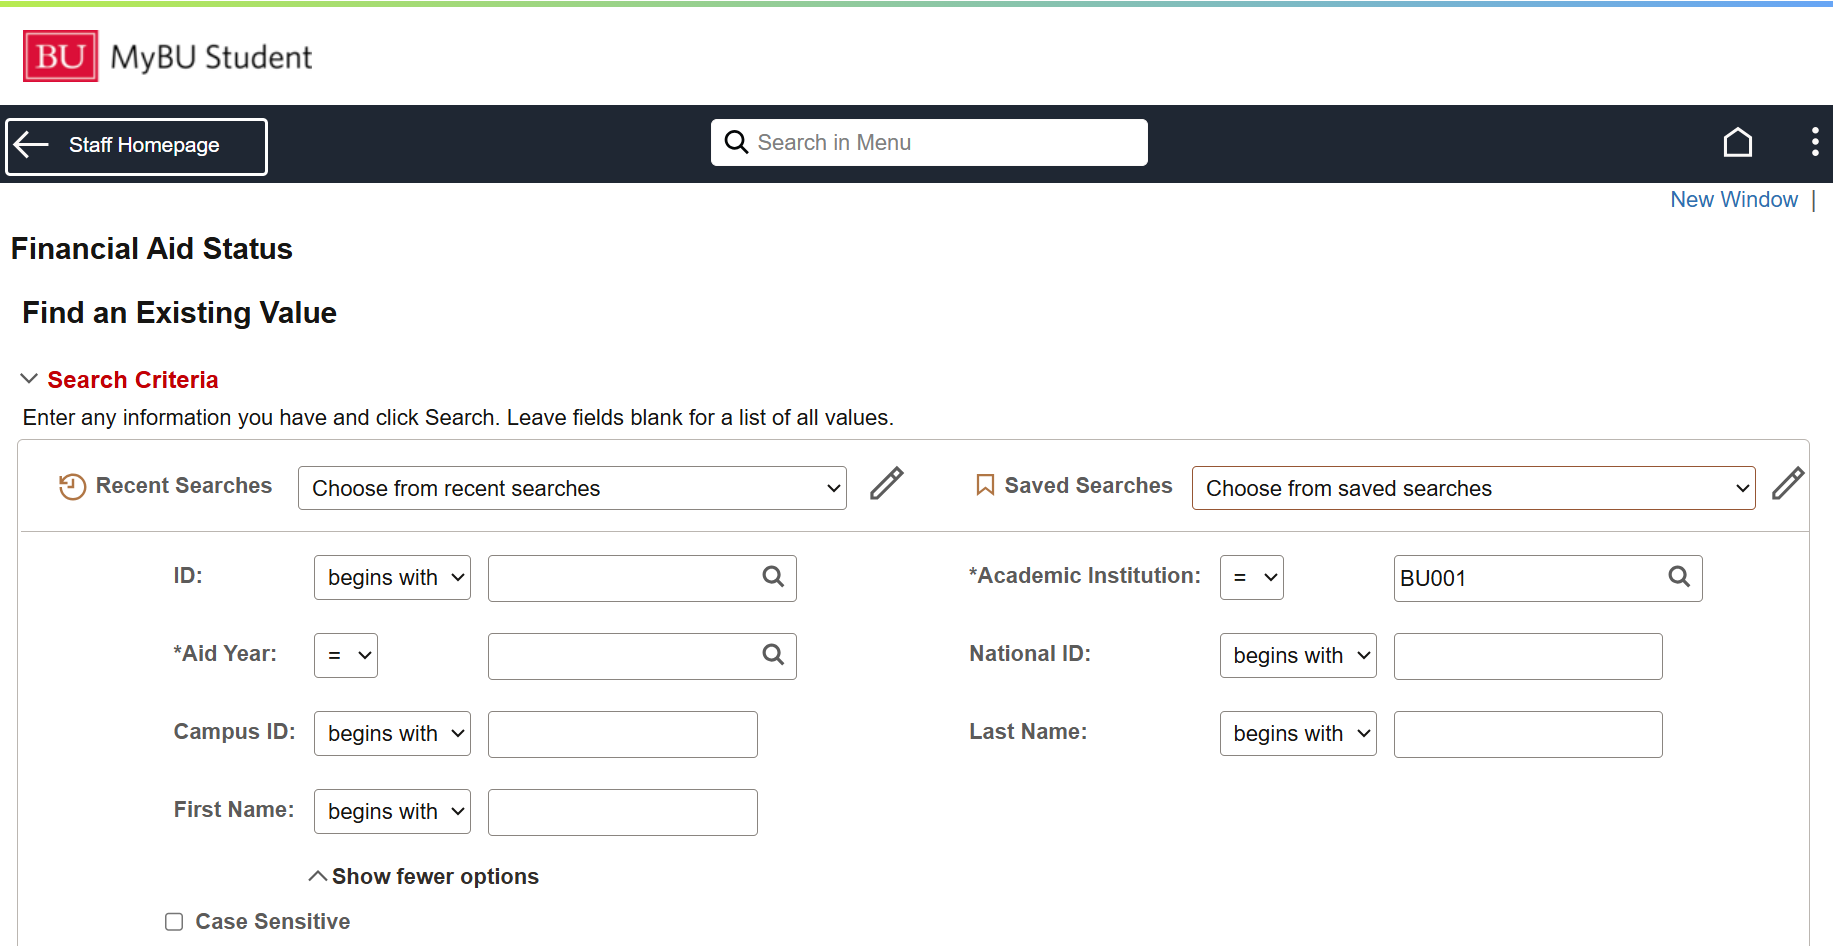
- From the Full Site, navigate to Financial Aid > View Financial Aid Status.
- On the search screen, input the student’s UID and applicable Aid Year. Click Search.

- The student’s View Financial Aid Status page will appear. Scroll down to the first table below the summary to view Checklist data, including the status of each checklist item.
- Authorized users can click on an Item Code to view/edit that item on the Checklist Management page. Refer to the sections below for information on Checklist Management.

Related Resource: View Financial Aid Status
To view Checklist with Act As User functionality:
- Use Lookup Student and Act As User to enter the ‘Act As’ interface for the student.
- Checklist items can be previewed and accessed from the Dashboard under the To Do’s section. Users can also navigate to the To Dos page from the left-side navigation menu, under My Information.

- On the To Dos page, click on an item to view the details and description. The Description will usually include an explanation of applicable statuses for that checklist item.
Note in the below example how the FAFSA for both the current Aid Year (2026) and upcoming Aid Year (2027) are included. The last two digits of the aid year are often included in the name of the item to help users quickly distinguish between items.

Item Statuses
The status of a Checklist item will change as pertinent documentation is processed and reviewed by Financial Aid staff. Some items may appear on the Checklist already in ‘Received’ or ‘Completed’ status.
The meaning of each status as it relates to a specific checklist item will be defined in the item’s Description. But in general, the following statuses will most commonly apply:
- Initiated – item has been assigned.
- Received – document has been submitted by student, but not reviewed
- Complete – item has been processed
Upon review of submitted documentation, additional related requirements may also be added by Financial Aid staff. Refer to the sections below for more information.
For questions about the appropriate use and system configuration of Checklist items and their statuses, contact the central Financial Aid office.
Add Item to a Student's Checklist
- Navigate to the View Financial Aid Status page and input the student’s UID and Aid Year. (See instructions in the View a Student’s Checklist section above if needed.)
- Within the student record displayed, click the Checklist icon at the top of the screen.

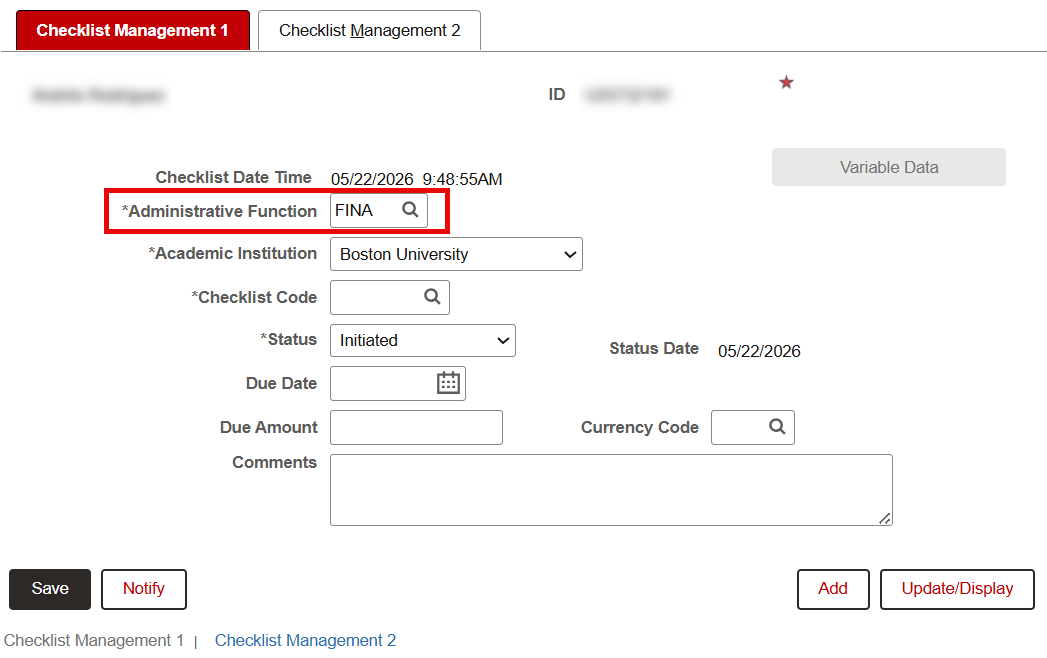
- The Checklist Management 1 tab is active by default. Enter ‘FINA’ in the Administrative Function field.
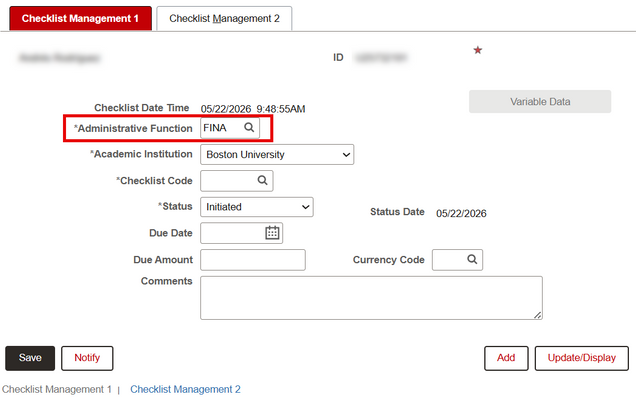
- In the Checklist Code field, click the magnifying glass to select the code for the applicable aid year. This will establish the available Checklist Items that have been configured for that aid year.

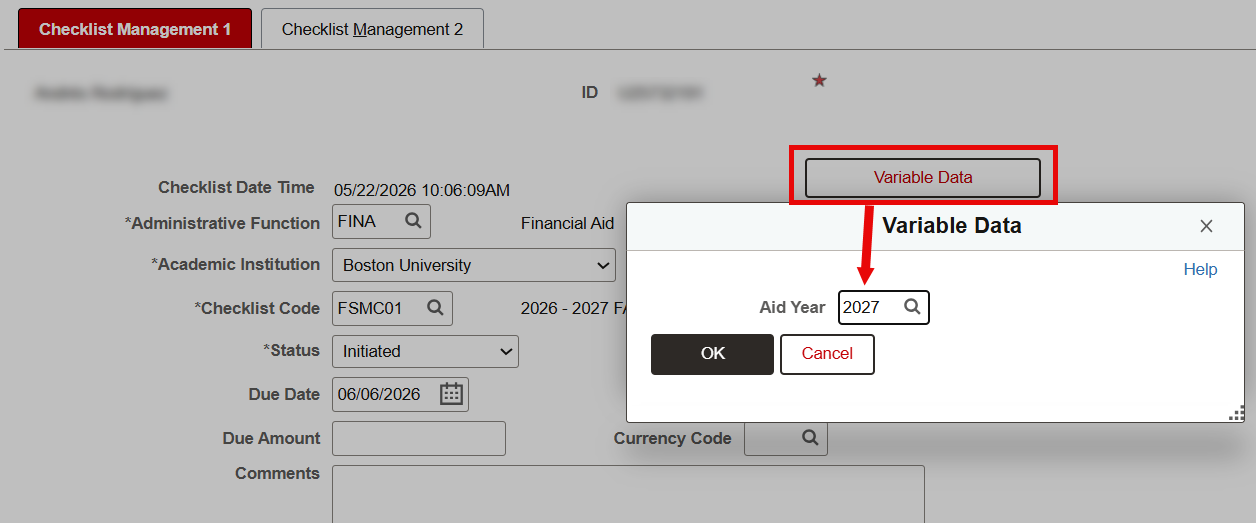
- The Variable Data button will now be clickable. Click and input the Aid Year code to verify, then select OK.

- Toggle to the Checklist Management 2 tab and input the checklist item code in the Item field (or click the magnifying glass to look up and select).
ⓘ NOTE: Even though the Aid Year was established on the first tab, the item lookup may display item codes from all available aid years. If the item is specific to the aid year, be sure to select that item accordingly. Aid Year-specific items will include the last two digits of the aid year in the Item Description.

- If needed, modify the Status, Status Date, and/or Due Date. The Sequence order can also be adjusted, if there are already items currently assigned to the student. These values will display to the student when viewing their Checklist.
- The user’s UID and name will automatically populate as the staff person responsible for the Checklist Item, but this can also changed or removed if needed.
- Click Save.

For questions or requests regarding the configuration and management of available Checklist Items in the system, submit a ticket to ithelp@bu.edu and include “Financial Aid Checklists” in the subject.
Update Student's Checklist
- Navigate to Campus Community > Checklists > Person Checklists > Checklist Management – Person. Or, navigate to the Checklist Management page via View Financial Aid Status as described in the section above.
- Input the student’s UID in the Search Criteria.
- It may also be helpful to input ‘FINA’ in the Administrative Function field in order to view Financial Aid checklist items only.

- Click Search and scroll down to view the Search Results. These results will show one line for all applicable aid years as identified by the overall Checklist Code for that aid year’s list. Click anywhere on a row to open.

TIP! If unsure of which Checklist Code pertains to which Aid Year, simply click the first row to open. Then navigate between aid years as needed using the ‘Previous in List’ and ‘Next in List’ buttons.
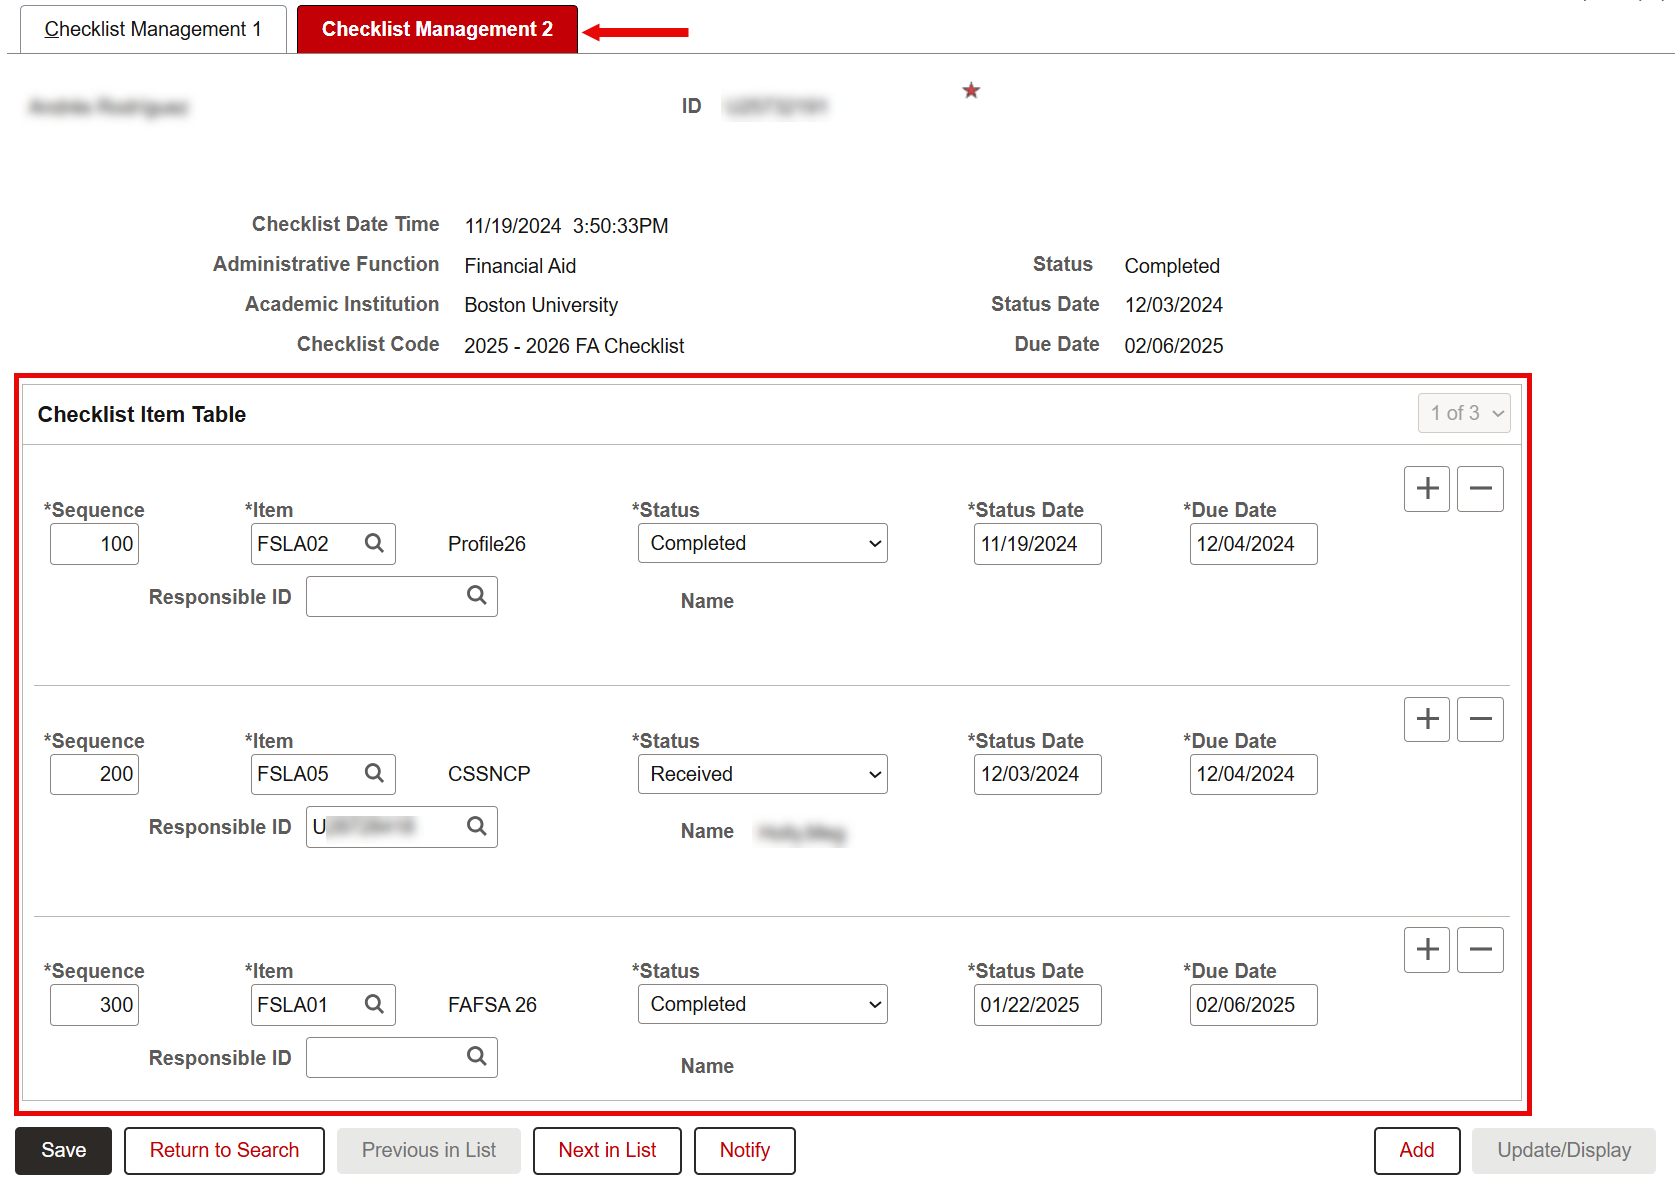
- Select the Checklist Management 2 tab to view and/or modify the student’s Checklist Items for that year using the Checklist Item Table.
- Some common updates may include changing the Status of an item to ‘Completed’ or ‘Waived’, modifying the Sequence order, or deleting an item using the minus button on the right of that row. Note that updating the Status will automatically update the Status Date to the current date.
ⓘ Please adhere to any departmental policies and procedures regarding the management of Checklist items.

- Be sure to click Save when finished.
Page last updated May 2026. To download a PDF copy of this resource, print this webpage as a PDF.