Students: Drop or Swap Class
This resource covers how students can drop or swap classes after enrollment has occurred.

Introduction
This resource provides instructions for students on how to Drop or Swap classes. It includes explanations for how to swap:
- a single component class,
- the primary section (e.g., Lecture) of a multi-component class, and
- a non-primary section (e.g., Lab, Discussion) of a multi-component class.
Swapping allows for the drop of one class and the enrollment in another class. The original class will not be dropped if the enrollment in the new class is not successful.
These actions must be taken within the appropriate time period; for more information on important registration activity dates and times, please refer to the Registrar website.
For information on enrollment appointments or class permissions, please refer to your department’s policies and communications.
⚠︎ Screen options and menus will vary by user; please note that displays may differ for you based on access that has been granted. All screens shown are for training purposes only.
Drop
- Navigate to Enrollment > Drop Classes in the MyBU Student Dashboard left menu. The Drop Classes page will open.
Refer to this image for the remaining steps in this section:

- From the drop down menu in the upper left corner, select the Term containing the desired class. The classes enrolled for that Term will display.
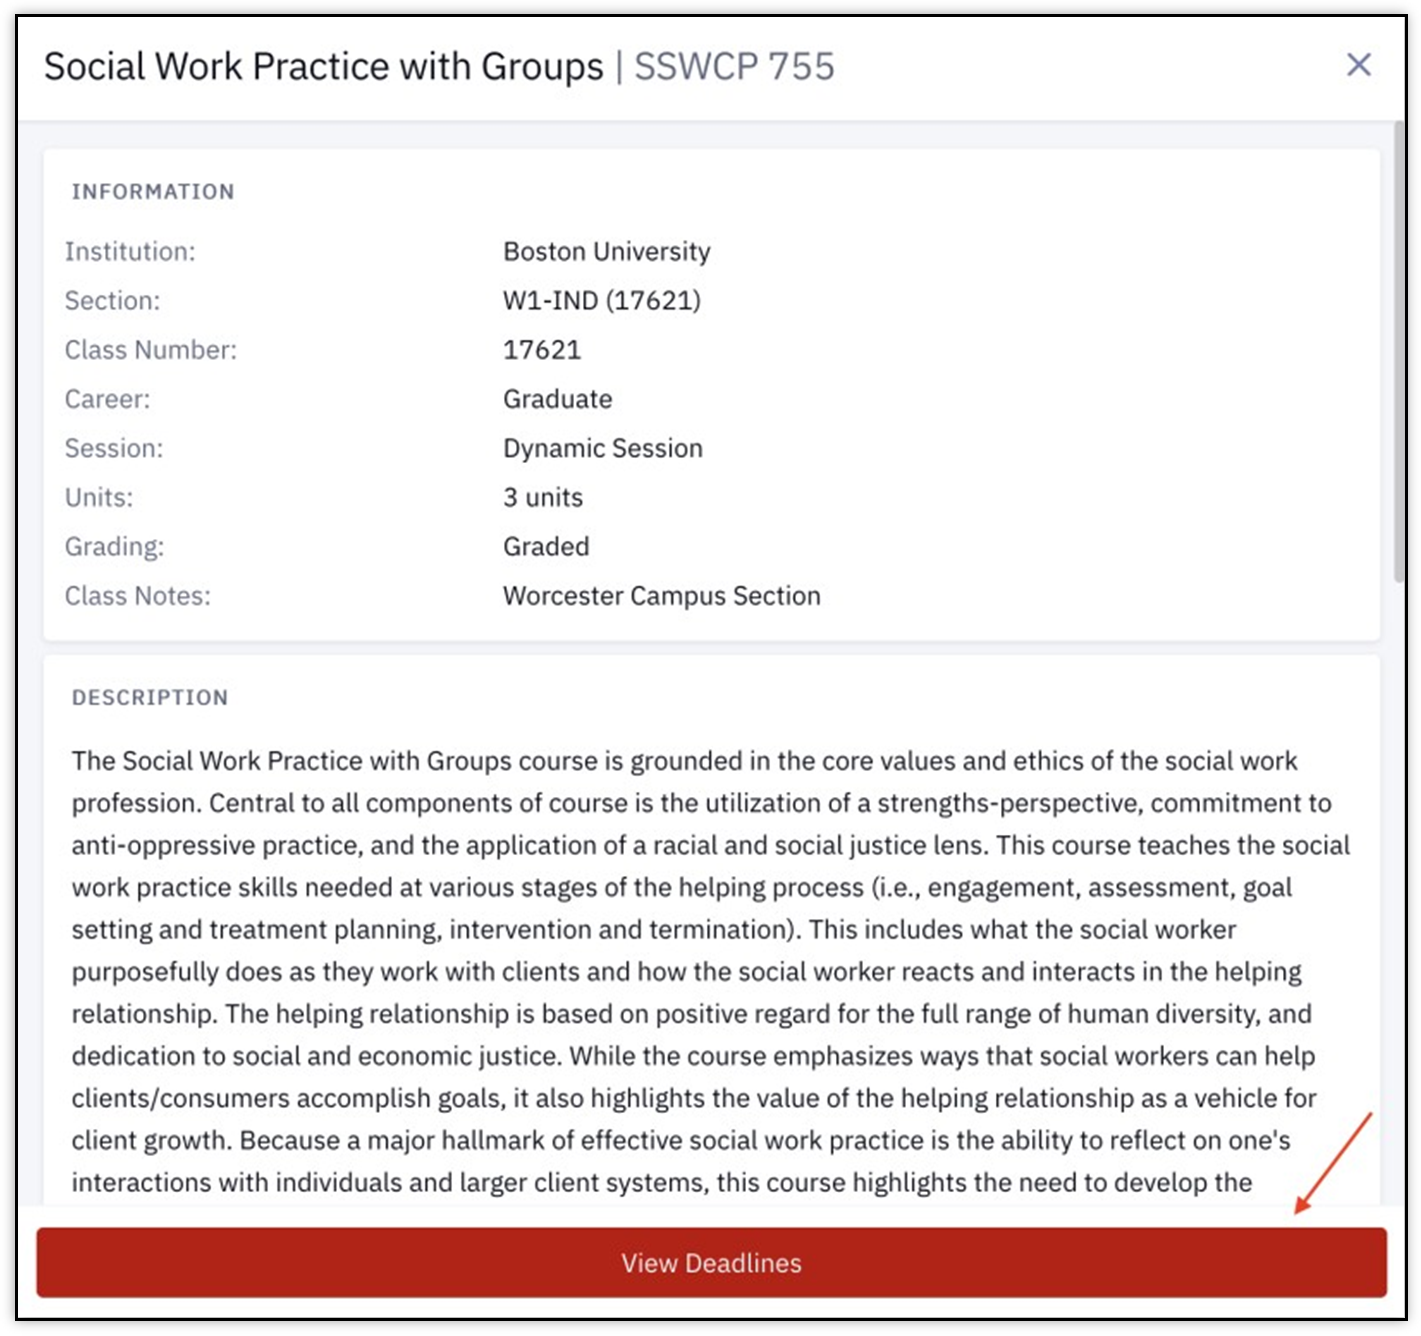
- Click the arrow on the class to see more details. Click the 3 dots menu and select View Deadlines to see Academic Calendar Deadlines for the class. For more information, refer to the “View Deadline Dates” section below.
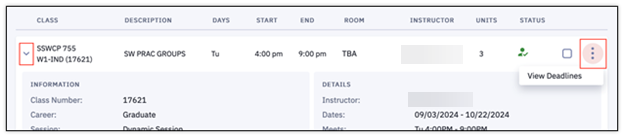
- Select the checkbox for the class to drop, as shown above (multiple classes can be selected at once).
- Click the Drop button at the top of the page.
TIP! This is the last step in processing the class drop. Clicking the Drop button will perform the drop action.
- A confirmation message will display indicating the class has been removed. Click OK to exit.

Swap Class/Primary Section
Swapping allows for the drop of one class and the enrollment in another class. The original class will not be dropped if the enrollment in the new class is not successful.
To swap a single component class, or to swap only the primary component (e.g., Lecture) of a multi-component class:
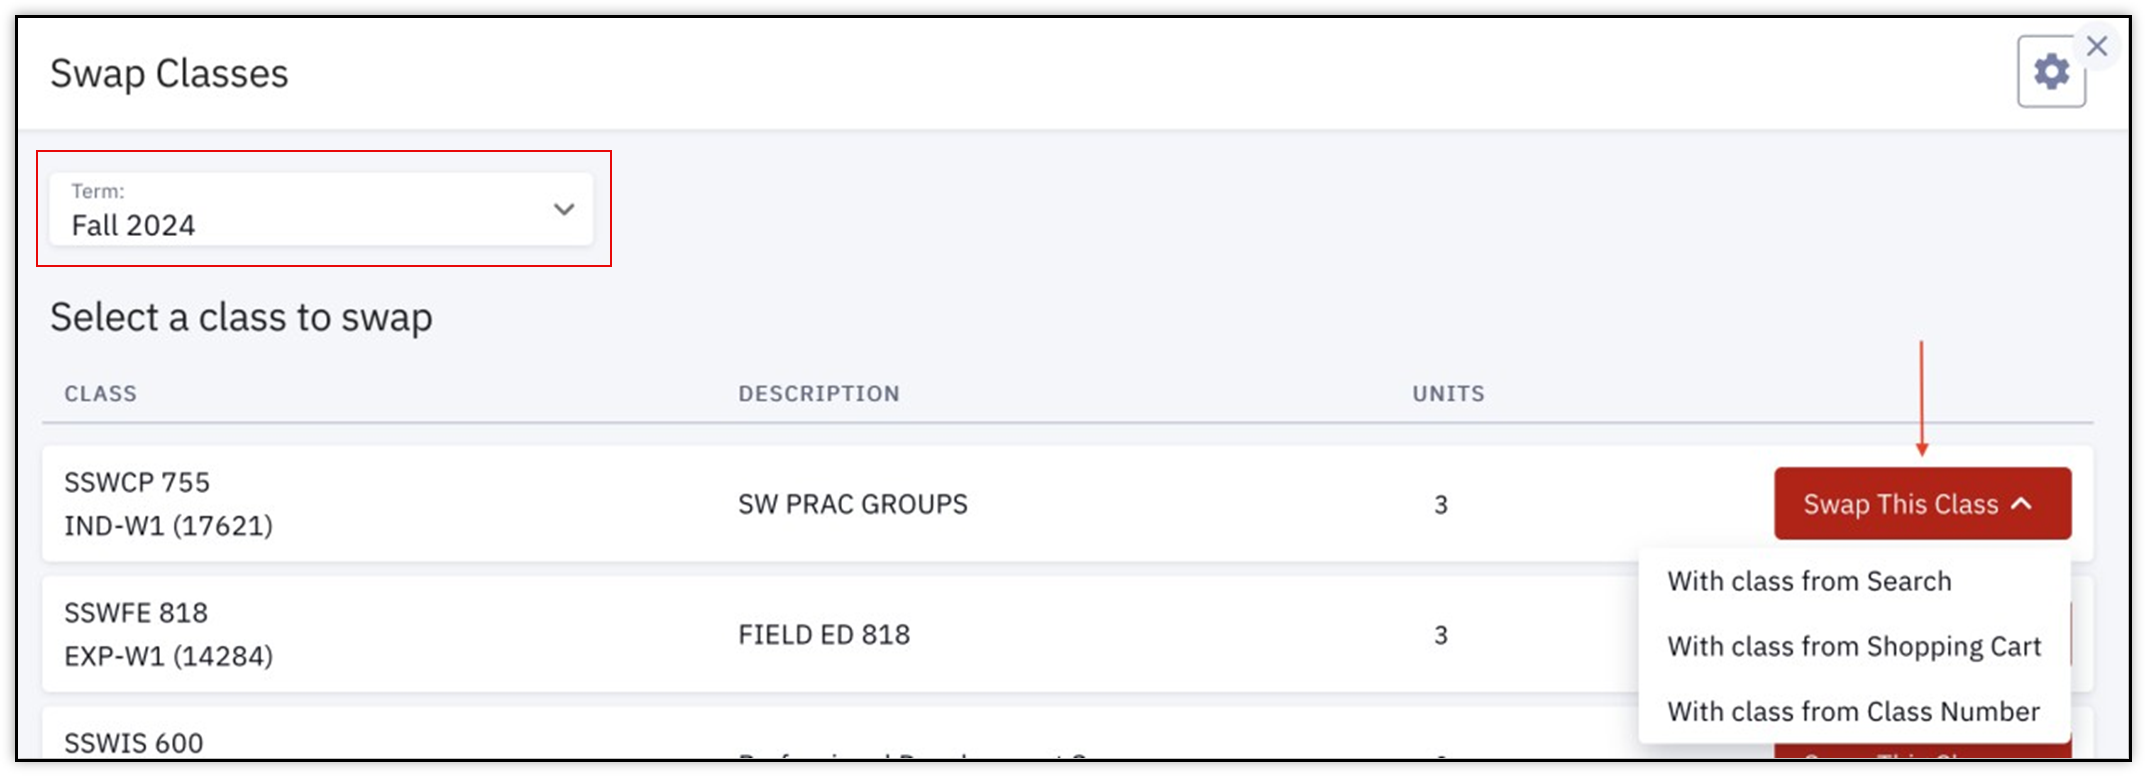
- Navigate to Enrollment > Swap Classes in the MyBU Student Dashboard left menu. The Swap Classes page will open.
- From the drop down menu in the upper left, select the Term containing the desired class. The classes enrolled for that Term will display.
- On the class to swap, click the Swap This Class button to open a menu of three swapping methods. Each swapping method is explained in a separate section below:
- With class from Search
- With class from Shopping Cart
- With class from Class Number

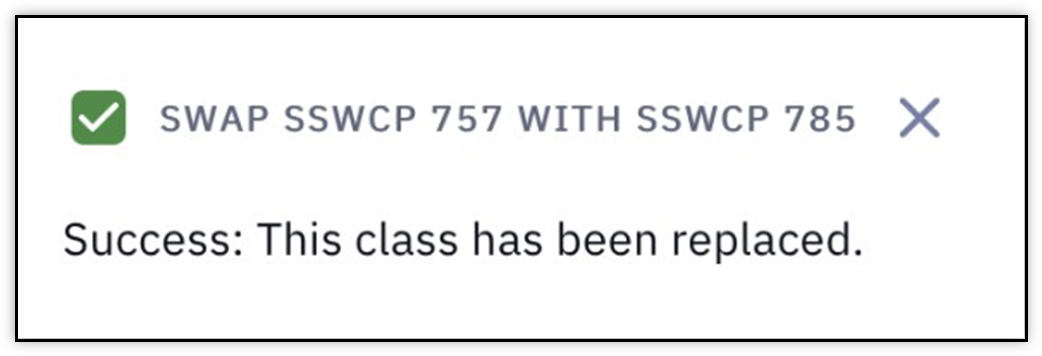
- After completing one of the three swapping methods, the action is summarized on the Swap Confirmation page. It outlines the class being replaced with the new class chosen for enrollment. In the example illustrated below:
- SSWCP 757-A1 (15163) was originally enrolled in and is now being removed (dropped).
- SSWCP 785-A1 (14221) is the new class being registered for, replacing the original.
- Click Confirm.

- If successful, the Swap Classes page will return, and a confirmation message will display in the top right corner.

ⓘ NOTE: Enrollment verification for the new class still occurs with this method. If the proper criteria aren’t met for registration, it’s possible an error will occur. One example may include reserve capacity requirements, as illustrated below:
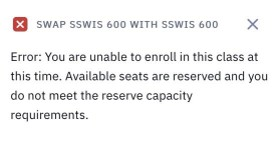
The original class will not be dropped if the enrollment in the new class is not successful. For more examples of possible enrollment conflicts, please refer to the Enrollment Messages resource.
Swap with Class from Search
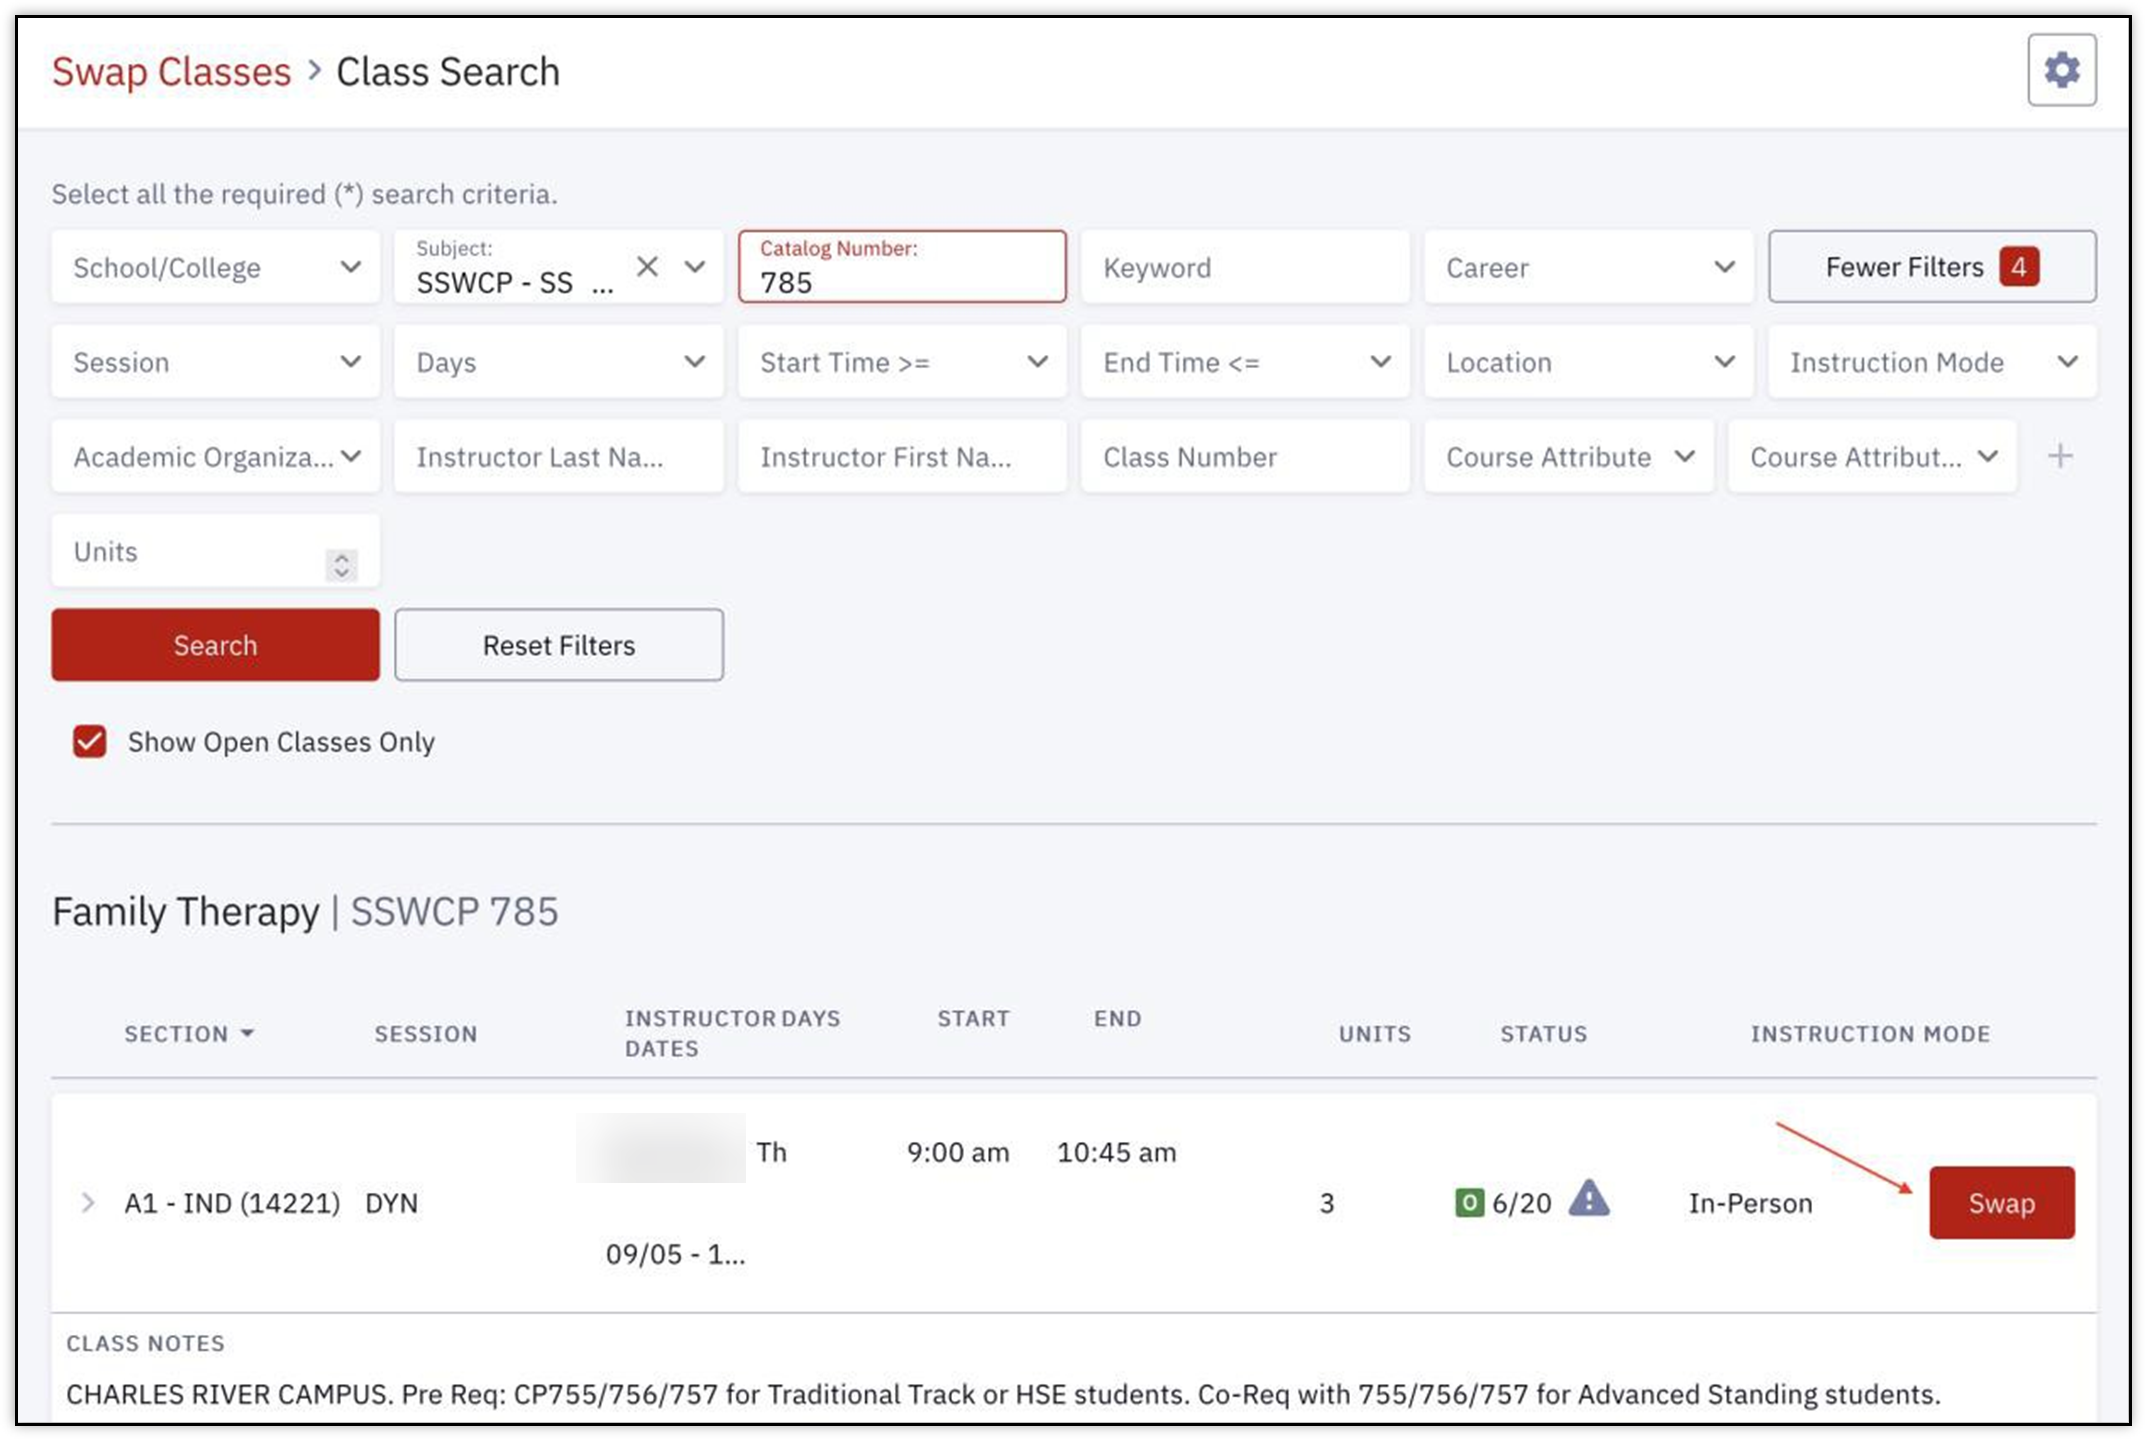
Upon selecting the With class from Search option from a Swap this Class button on the Swap page (as explained in “Swap Class/Primary Section” above), the Class Search page will open.
- Enter the criteria to search for desired class(es).
- For more details on using the Class Search function, please refer to the Preparing for Registration and Class Search resources.
- Once the new class has been found, click the Swap button on that class.

- Review that the swap action summarized in the Swap Confirmation page is correct, then click Confirm to perform the swap.
- Look for either the confirmation message or error message that indicates whether or not the class was successfully replaced. See “Swap Class/Primary Section” above for examples.
- The original class will not be dropped if the enrollment in the new class is not successful.
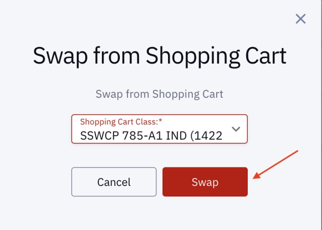
Swap with Class from Shopping Cart
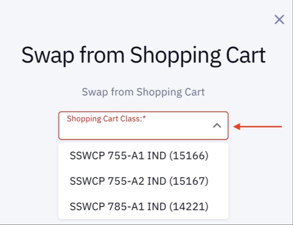
Upon selecting the With class from Shopping Cart option from a Swap this Class button on the Swap page (as explained in “Swap Class/Primary Section” above), a pop-up Swap from Shopping Cart window will open.
- Click the Shopping Cart Class drop down to view all classes that have been previously added to the Shopping Cart.
- For more details on using and adding classes to the Shopping Cart, please refer to the Preparing for Registration or Methods of Registration resources.
- Once the new class has been selected in the drop down, click the Swap button.
- Review that the swap action summarized in the Swap Confirmation page is correct, then click Confirm to perform the swap.
- Look for either the confirmation message or error message that indicates whether or not the class was successfully replaced. See “Swap Class/Primary Section” above for examples.
- The original class will not be dropped if the enrollment in the new class is not successful.
Swap with Class from Class Number
Upon selecting the With class from Class Number option from a Swap this Class button on the Swap page (as explained in “Swap Class/Primary Section” above), a pop-up Swap by Class Number window will open.
- Type the Class Number directly in the Class Number field.
- For an overview of Class Numbers, please refer to the Class Numbers Explained resource.
- Click the Swap button.

- An Enrollment Options pop up window may appear. If desired, click the checkbox next to Wait list if class is full. Click Save.

- Review that the swap action summarized in the Swap Confirmation page is correct, then click Confirm to perform the swap.
- Look for either the confirmation message or error message that indicates whether or not the class was successfully replaced. See “Swap Class/Primary Section” above for examples.
- The original class will not be dropped if the enrollment in the new class is not successful.
Swap Section of Multi-Component Class
Follow these steps if a non-primary section (e.g., Lab, Discussion) of a multi-component class needs to be swapped.
- Navigate to Enrollment > Edit Enrollment in the MyBU Student Dashboard left menu. The Edit Enrollment page will open.
- From the drop down menu in the upper left, select the Term containing the desired class. The classes enrolled for that Term will display.
- Click the Edit button on the class containing the section to swap.
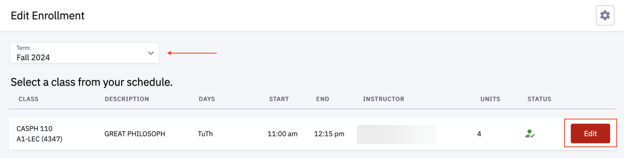
- In the Edit Class Sections page, the class information will display with the associated sections to choose from; click the radio button next to the section to enroll into.
- Click Continue.

- In the Confirm Changes window that pops up, review details of the discussion sections to be swapped. The window lists the Original Value information (the section with the original registration), and the New Value information (this is the new section being enrolled in). Click Continue to complete the swap process.

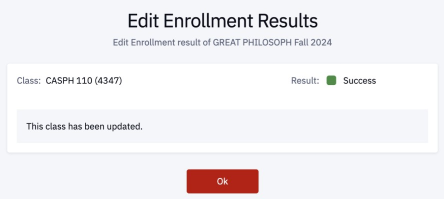
- The Edit Enrollment Results message will display, confirming a successful enrollment or listing any possible registration errors.
- Click Ok to return to the Edit Enrollment page.
ⓘ NOTE: The original section will not be dropped if the enrollment in the new section is not successful. For more examples of possible enrollment conflicts, please refer to the Enrollment Messages resource.
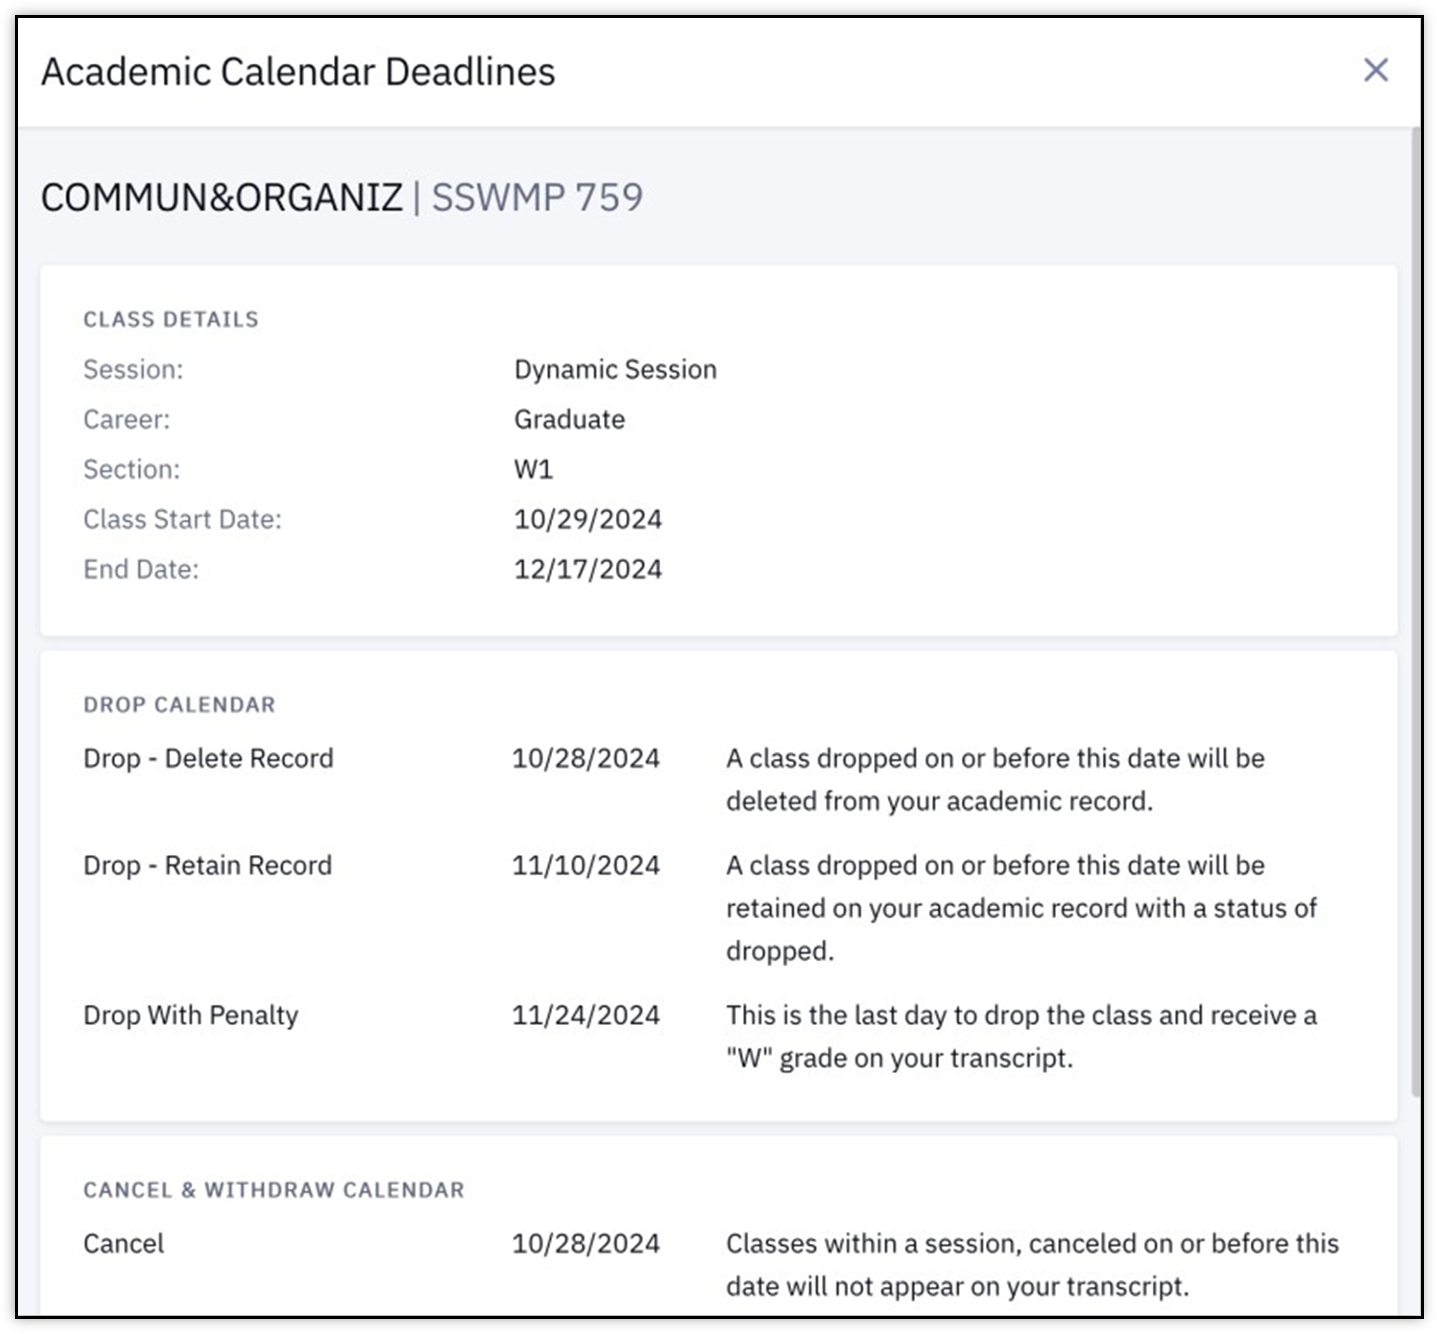
View Deadline Dates
Use the Schedule page to view classes that have been enrolled and review the deadlines for activities such as dropping or withdrawing a class.
- Navigate to the MyBU Student Dashboard and select Schedule from the left menu.
- A Calendar view of the current class schedule will open. Click on a class to view its details. In the Class information display, click View Deadlines.

- If a List view is preferred, use the icons in the upper right to toggle between Calendar and List views:

In List view, select the desired Term from the drop down menu, click the arrow icon to expand class details, and click the three dots menu to select View Deadlines.
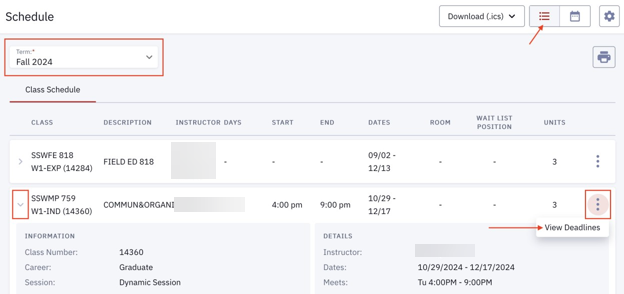
- After clicking View Deadlines in either the Calendar or List view, the Academic Calendar Deadlines window appears listing drop, cancel, and withdraw dates for that class, as shown below.

Related Resources
The following links provide further details about concepts and actions explained on this page:
Page last updated March, 2026. For a downloadable PDF copy, print this webpage as a PDF.