Staff: Enrollment Verification
This resource provides information for staff on how to generate Enrollment Verification information for students.
![]()
Introduction
Staff with the appropriate access can follow these instructions to generate an Enrollment Verification Report for a student, including how to add an address or notes.
Review the Students: Enrollment Verification resource to learn about the self-service feature students can use to generate reports for themselves. Note that staff do not have access to that feature.
⚠︎ Screen options and menus will vary by user; please note that displays may differ for you based on access that has been granted. All screens shown are for training purposes only.
Initial Request
- On the Full Site homepage, click on the NavBar icon on the far right.
 If starting from the Dashboard, scroll through the left menu, click to open the Full Site homepage, then select the NavBar icon.
- Navigate to: Menu > Records and Enrollment > Enrollment Verifications > Enrollment Verification.

- The Enrollment Verification Req: Find an Existing Value window will open. To search for a student, enter available criteria and press Search.
- To save a search for re-use at a later time, press the Save Search button at the bottom of the window. Click on the Saved Searches dropdown at the top of the window to use saved searches.
- Use the Recent Searches dropdown at the top of the window to repeat recent searches.

- The Enrollment Verification Req tab will open.
- If this is the first Enrollment Verification report for this student, only one row will display, listing On Request. Data fields are open for editing.

- If Enrollment Verifications for this student have been generated in the past, these list as Completed and may be viewed either by scrolling through the arrows or clicking the View All link at the top of the display. Data fields are greyed out and not editable, but previously run reports can be retrieved again; see “View Report” section below for more information.

- If this is the first Enrollment Verification report for this student, only one row will display, listing On Request. Data fields are open for editing.


Generate Enrollment Verification
If Enrollment Verifications for this student have been previously generated, add a new row using the plus icon. If there aren’t previous documents, the fields on the page will default for a new entry.
- Select the values in the From and To Term fields if there are particular Terms the verification needs to run for.
- If no Term is selected, all applicable Terms for the student will generate.
- Select the checkboxes to include the desired data on the document: Current Program and/or Earned Degrees.
- If an address or note needs to generate on the report, enter that information on the Address and Note tabs before clicking Print. Refer to “Address” and “Note” sections below for more details.
- After completing the form fields, and entering any desired information into the Address and Note tabs, click Print.

A green banner will display at the top of the page to indicate Saving Page.

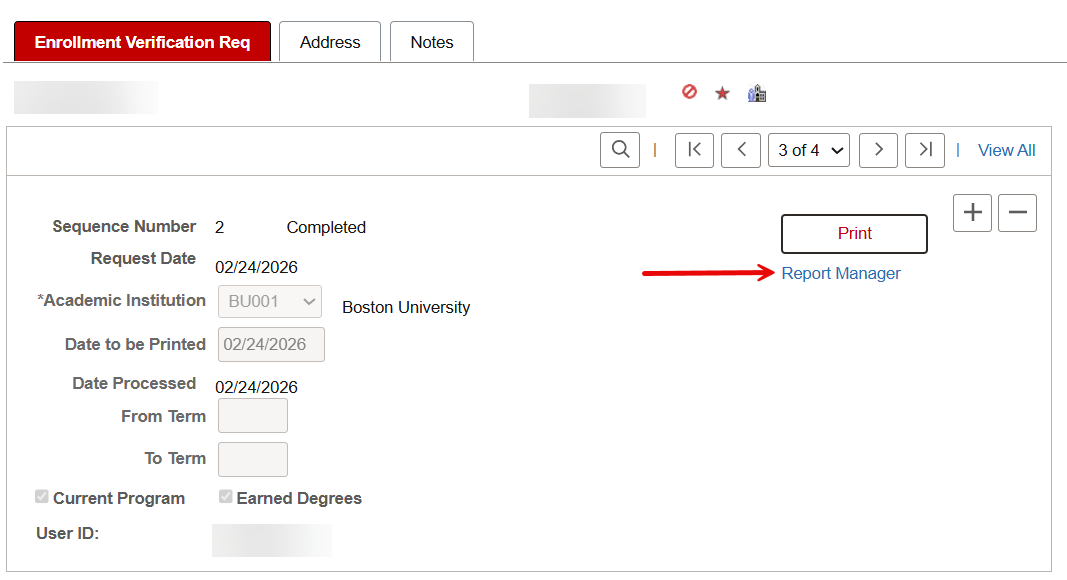
View Report
The steps to open an Enrollment Verification Report are the same whether revisiting a previously run report or continuing after Printing a new report, as explained in the previous section.
- In the Enrollment Verification Req window, click the Report Manager link.

- The Report Manager – Administration Tab will open.
- In the View Reports For section, select various criteria to search additional reports if needed. Click the Refresh button to re-compile a new set of filters.
- The list of generated reports will default to those compiled within the last day. Adjust the date range in the View Reports For section to list reports generated prior to the last day.
ⓘ NOTE: It’s possible the system may require some processing time for the report to generate if it was just run. If the Report List is mostly blank, the report is still processing. After some time, use the Refresh button to re-compile.
- To view an Enrollment Verification report, click on the Description report link in the Report List.
- Each report will be listed with data, including the date and time it was run and its status. Click the Details link to display a report page that lists system data specific to the processing of the file.

The Enrollment Verification report, including the requested data, will open as a PDF in a new tab and can be downloaded or printed.

To return to the Enrollment Verification page, click the Go back to Enrollment Verification Req link, below the Report List in the Report Manager.


Address
The Address tab in the Enrollment Verification Req window allows for selection, or entry, of an address. This will generate at the top of the report.

- Click on the Address tab before the report is generated via the Print button on the Enrollment Verification Req tab, as explained in the “Generate Enrollment Verification” section above.
- Either select or enter an address:
- To select an existing address for the student, click on the Send to Requestor checkbox, verify the name that populates the Send to Field. and choose the Address Type from the dropdown menu.

Verify details in the window that pops up and click OK to return to the Address tab with the address populated. Use the Edit Address button if further changes are required.
- To enter an address that does not exist in the system for the student, type the desired information in the Send to and Country fields, then click the Edit Address button to open a new window with blank address fields for entry.

Click OK to return to the Address tab with the full address populated.
The address will now be included on the report generated by going back to the Enrollment Verification Req tab and clicking Print, as explained in the “Generate Enrollment Verification” section above.
- To select an existing address for the student, click on the Send to Requestor checkbox, verify the name that populates the Send to Field. and choose the Address Type from the dropdown menu.

Notes
The Notes tab allows for entry of any comments related to this request. Notes will generate below the enrollment information on the report.

- Click on the Notes tab before the report is generated via the Print button on the Enrollment Verification Req tab, as explained in the “Generate Enrollment Verification” section above.
- Enter the note into the Enrollment Verification Notes text box.

The note will now be included on the report generated by going back to the Enrollment Verification Req tab and clicking Print, as explained in the “Generate Enrollment Verification” section above.
TIP! An example of a Note may be to indicate that English is the instruction language: “The language of instruction at Boston University is English.”
Page last updated February, 2026. For a PDF copy, print this page as a PDF.