Credit Overload Process for Tuition
This resource provides information for staff on how to manage credit overload approvals for accurate Student Financial charges in MyBU Student.

Introduction
This information is meant for Schools/Colleges staff who need to manage the credit overload process to adjust tuition. To indicate approval has been granted to students, Service Indicators (SIs) will be used. This process does not include student request/approval for academic overload.
OVERLOAD WAIVER INDICATOR
- A Service Indicator will be needed for graduate students and undergraduate first through third year students when they have been granted approval to exceed 18 credits.
- Undergraduate seniors and Kilachand Honors College (KHC) students are automatically granted tuition overload approval for up to 20 credits. This automatic approval occurs through Student Financial functionality.
- Proper approval and a Service Indicator would be needed if they wish to exceed 20 credits.
CERTIFIED FULL OR PART TIME SERVICE INDICATORS
Adding a Certified Full or Part Time Service indicator is used to manage charging for those students who are maintaining a full-time or part-time status, but their enrollment does not match their status. For charging to be accurate, Service Indicators impacting tuition as well as Approved Academic Load need to be entered for the student.
⚠︎ Screen options and menus will vary by user; please note that displays may differ for you based on access that has been granted. All screens shown are for training purposes only.
Manage Service Indicators
To add Service Indicators for credit overload or certified full/part-time status to the student’s record, use the Manage Service Indicators page.
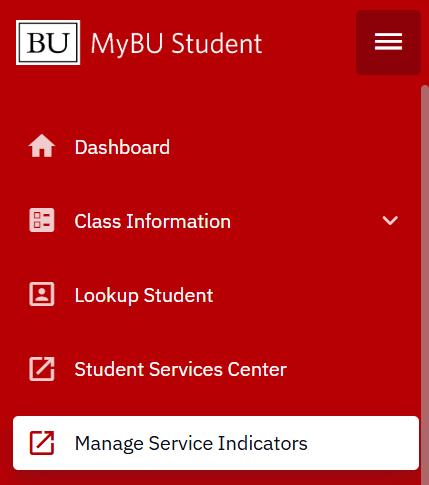
- Log into MyBU Student.
- Use the left-side navigation menu to select Manage Service Indicators.
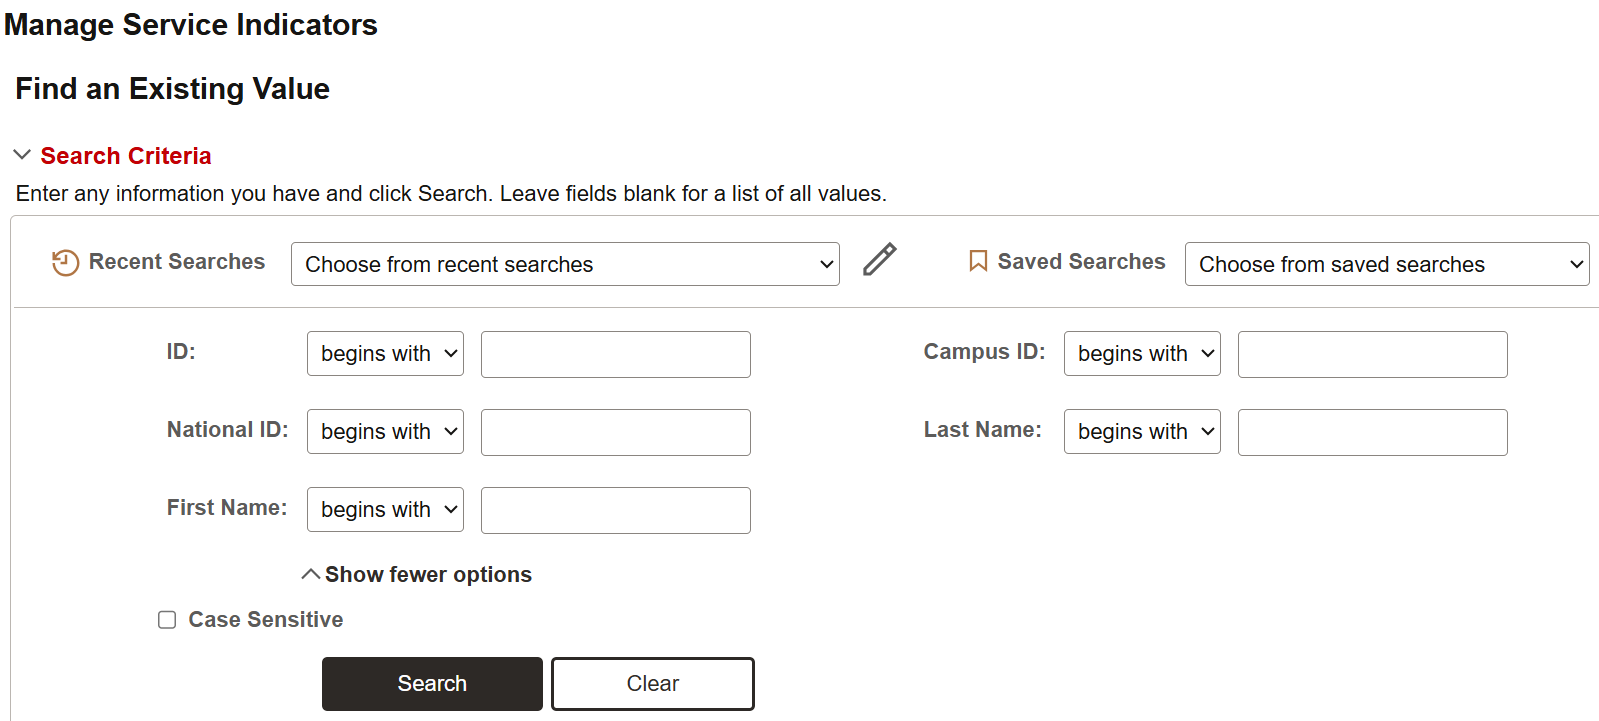
- Enter criteria to search for the student and click Search.

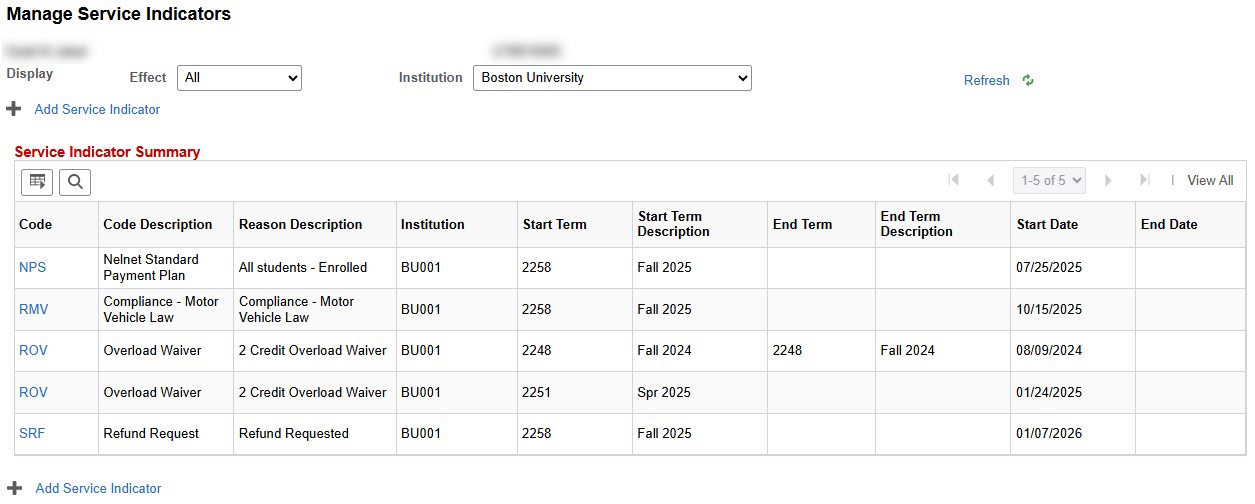
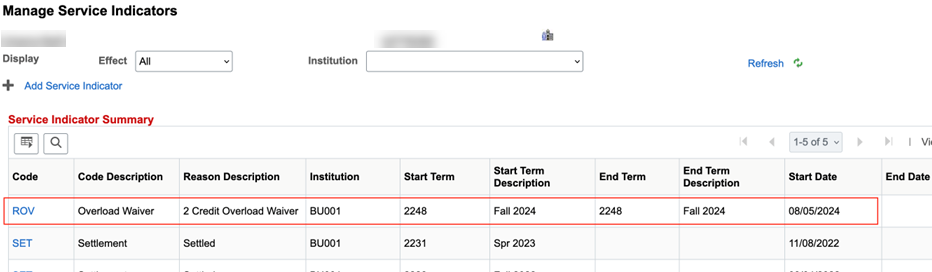
- Once the student has been selected, a summary page will open, listing any past or existing Service Indicators for the student.

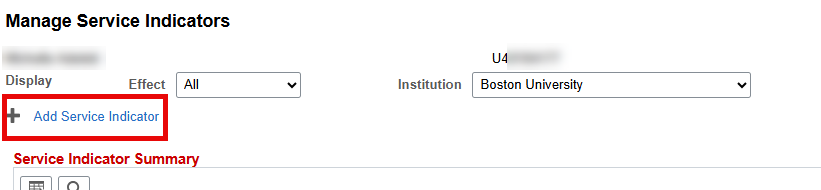
- Click Add Service Indicator.

- A window will open to enter Service Indicator details. Proceed to the steps outlined in the sections below for the Overload Waiver Service Indicator process or Certified Full or Part Time Service Indicator process.

TIP! For a deep dive walkthrough of the Manage Service Indicators page, check out the Service Indicators resource.
ADD OVERLOAD WAIVER INDICATOR
The Overload Waiver indicator is required for graduate students and undergraduate first through third years who have been granted approval to exceed 18 credits of enrollment for a standard term. Undergraduate seniors and KHC students require the Overload Waiver indicator if they have bee approved to exceed 20 credits for a standard term.
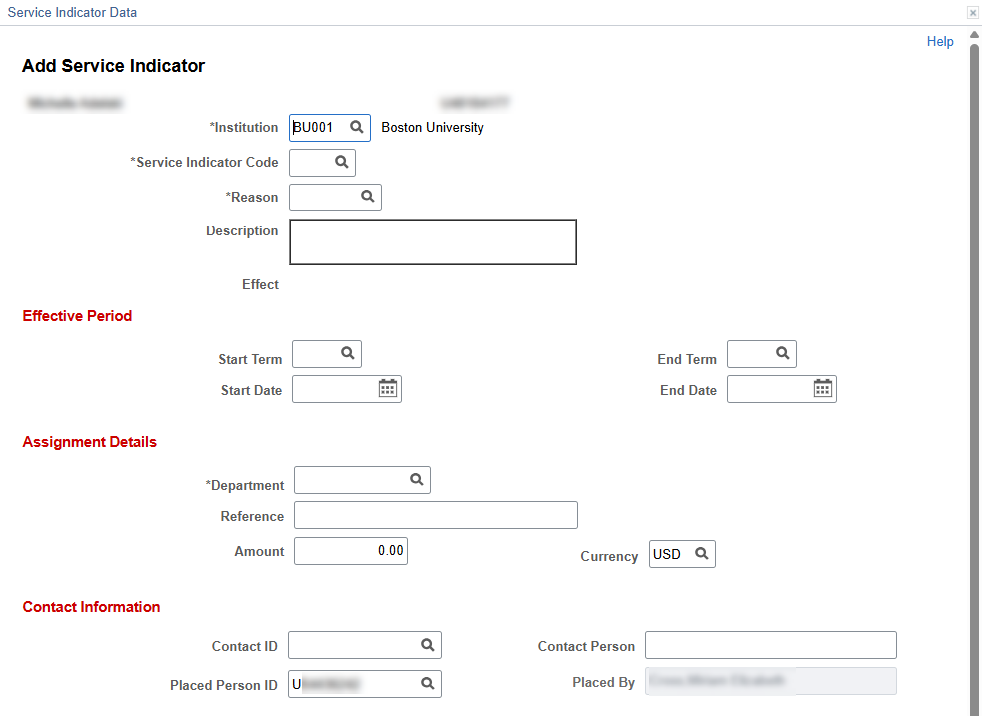
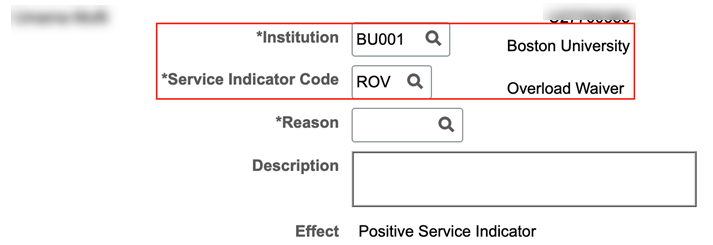
On the Add Service Indicator screen, input data as applicable:
- Institution: This should default to Boston University (BU001)
- Service Indicator Code: enter directly or lookup to find the value ‘ROV – Overload Waiver’.

- Reason: enter directly or lookup to find desired value.
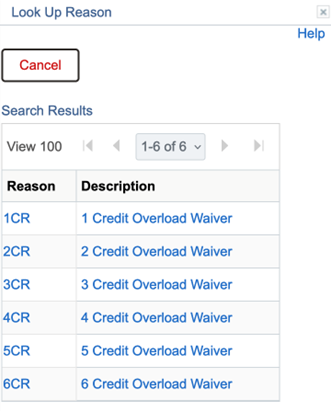
The code selected for this field equates to the number of credits that have been approved above the max credit limit.
- Undergraduate first through third years: Number of approved credits over 18. (For example, if the student is approved for 20 total credits for the term, select ‘2CR – 2 Credit Overload Waiver’.)
- Undergraduate seniors and KHC students: Number of approved credits over 20. (For example, if the student is approved for 21 total credits for the term, select ‘1CR – 1 Credit Overload Waiver’.)
- The Description and Effect fields will auto-populate based on the Service Indicator Code/Reason selected.
- The Description may be blank.
- ROV is a positive Service Indicator, meaning it does not put a hold on the student record.
EFFECTIVE PERIOD
- Start Term: enter directly or lookup to select the Term this approval applies to.
- Start Date: enter the date the Service Indicator is being added (today’s date).
- Leave End Term and End Date blank.
ⓘ NOTE: Start Term and Start Date are required fields. The Start Term is important as it impacts the charging the process. The Start Date can be the date of entry, even if it’s after the start of the term.
For example:

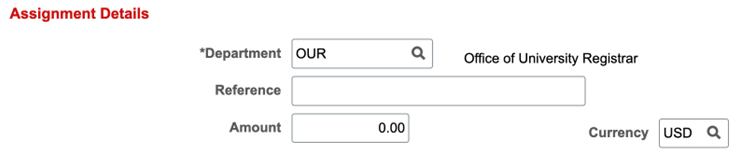
ASSIGNMENT DETAILS
- Department: enter or lookup to find the appropriate Department.
- Reference: enter if applicable.
- Amount: enter if applicable (generally not applicable for Overload Waiver.)
For example:

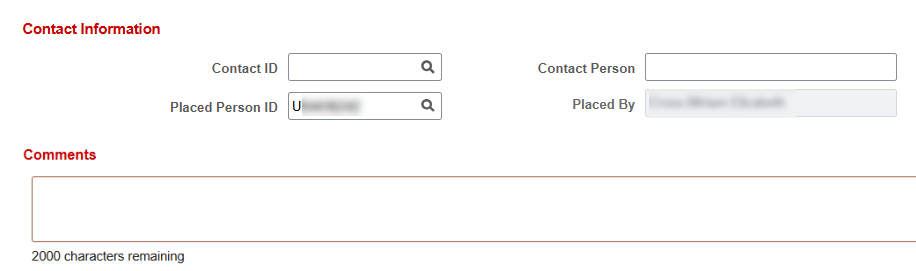
CONTACT INFORMATION & COMMENTS
- Contact ID & Person: enter if applicable.
- Placed Person ID & By: the staff details of the person who entered the SI will be auto-populated.
- Comments: enter any additional notes if applicable.

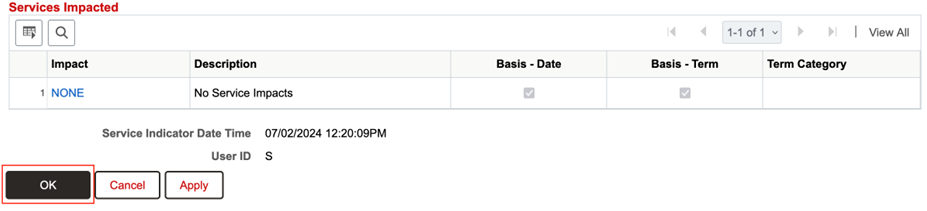
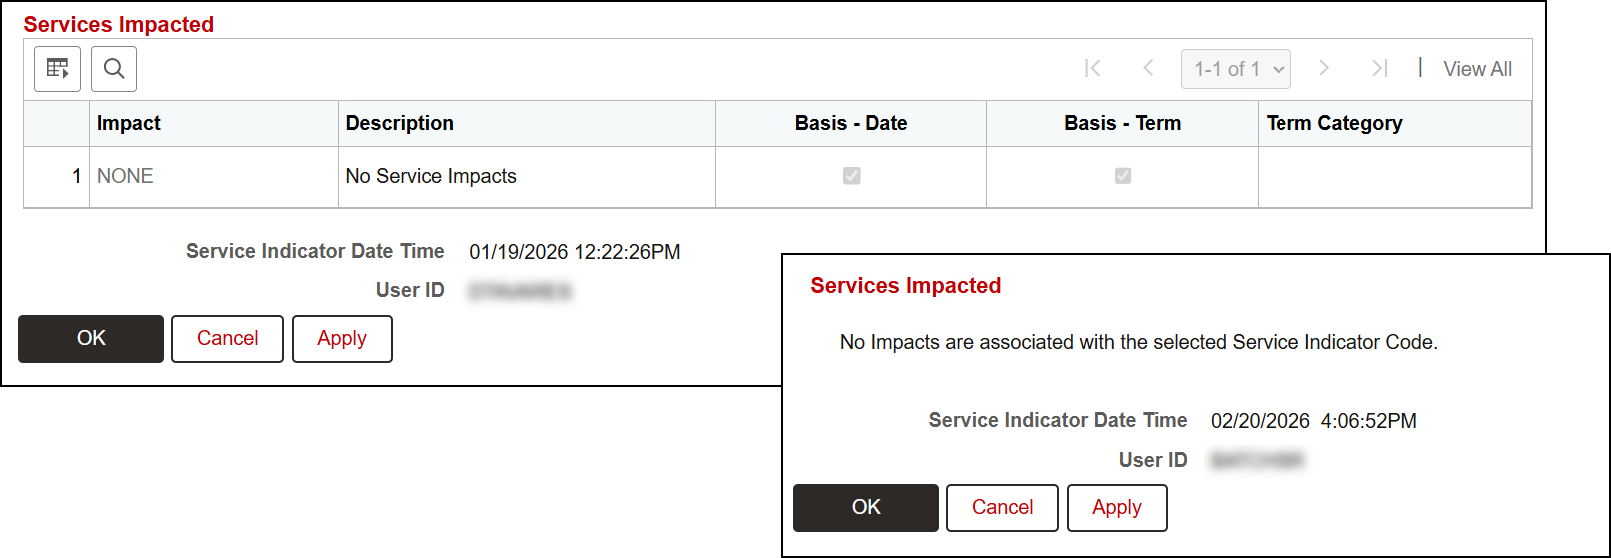
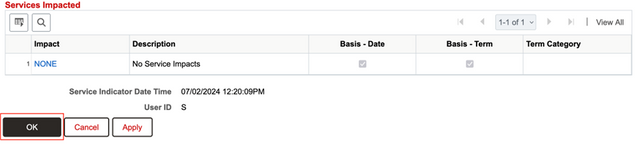
SERVICES IMPACTED
With some Service Indicators, there may be impacts upon student activity. Based on the SI selected, the Services Impacted section will populate the associated impact. (For example, an Advising Hold will have an ‘Impact – Block All Enrollment Activity’ item.)
The ‘ROV – Overload Waiver’ Service Indicator will default the item, ‘None – No service Impacts’.
- Click OK once all details have been entered to save the Service Indicator to the student’s record.
- Upon saving, the Manage Service Indicators summary page will display with the new ROV Service Indicator included.

ADD CERTIFIED FULL OR PART TIME INDICATOR
With this process, the student’s approved academic load will remain as full-time or part-time. Adding a Certified Full or Part Time Service indicator is used to manage charging for those students who are maintaining a full-time or part-time status, but their enrollment does not match their status. For charging to be accurate, Service Indicators impacting tuition as well as approved academic load need to be entered for the student.
On the Add Service Indicator screen, input data as applicable:
- Institution: This should default to Boston University (BU001)
- Service Indicator Code: enter directly or lookup to find the value ‘ROV – Overload Waiver’.
- Select RFT – Certified Full-Time for cert 3 and 4 populations.
- Select RPT – Certified Part-Time for the cert 5 population.

- Reason: enter directly or lookup to find desired value.
- The ‘RFT – Certified Full-Time’ indicator has either ‘NOLD – No Load’ or ‘PTLD – Part-Time Load’ options.
- The ‘RPT – Certified Part-Time’ indicator will default ‘NOLD – No Load’ option because it is the only associated reason value.
- The Description and Effect fields will auto-populate based on the Service Indicator Code/Reason selected. (The Description may be blank for these SIs.)
- RFT is a Positive Indicator.
- RPT is a Negative Indicator.
EFFECTIVE PERIOD
- Start Term: enter directly or lookup to select the Term this approval applies to.
- Start Date: enter the date the Service Indicator is being added (today’s date).
- Leave End Term and End Date blank.
ⓘ NOTE: Start Term and Start Date are required fields. The Start Term is important as it impacts the charging the process. The Start Date can be the date of entry, even if it’s after the start of the term.
For example:
ASSIGNMENT DETAILS
- Department: enter or lookup to find the appropriate Department.
- Reference: enter if applicable.
- Amount: enter if applicable (generally not applicable for Overload Waiver.)
For example:
CONTACT INFORMATION & COMMENTS
- Contact ID & Person: enter if applicable.
- Placed Person ID & By: the staff details of the person who entered the SI will be auto-populated.
- Comments: enter any additional notes if applicable.
SERVICES IMPACTED
With some Service Indicators, there may be impacts upon student activity. Based on the SI selected, the Services Impacted section will populate the associated impact. (For example, an Advising Hold will have an ‘Impact – Block All Enrollment Activity’ item.) Both RFT and RPT have no service impacts, but this will display differently for each:
- The ‘RFT – Certified Full-Time’ Service Indicator will default the item, ‘None – No service Impacts’.
- The ‘RPT – Certified Part-Time’ Service Indicator will simply display that there are no impacts.

- Click OK once all details have been entered to save the Service Indicator to the student’s record.
- Upon saving, the Manage Service Indicators summary page will display with new RFT or RPT Service Indicator included.
For example:

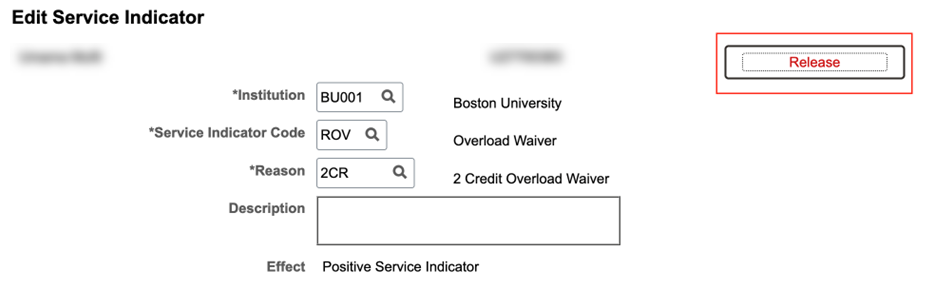
EDIT OR RELEASE SERVICE INDICATOR
To remove or edit details entered on a Service indicator, navigate back to the Manage Service Indicators page.
- In the Service Indicator Summary section, click on the desired Service Indicator Code to open the Edit Service Indicator page.
- Edit the desired fields and click the OK button to save.
- Or, to REMOVE the SI, click the Release button.
For example:

- A message will display asking for release confirmation. Click OK.
- Upon saving, the Manage Service Indicators summary page will display. If the Service Indictor was released it will no longer be listed.
Page last updated March 2026. For a PDF copy, print this webpage as a PDF.