Introduction to Using MyBU Student
This information introduces staff and faculty to foundational concepts of using the MyBU Student system. It provides a general overview of navigation as well as foundations for areas that some staff will interact with.
![]()
![]()
Introduction
The Boston University Student Information System, MyBU Student, facilitates operations for the entire student lifecycle, from admission to graduation. This resource walks through the general principles on how staff and faculty will navigate MyBU Student and includes additional details for administrative staff on managing searches and working with effective dated rows.
Navigation
Access will vary by user and is dependent on the security permissions granted. Please note that displays may differ for you based on that access.
The homepage may vary depending on the type of role and security assigned. If the Full Site is assigned as the landing page upon login, please skip to the next section, Accessing the Additional Full Site.
DASHBOARD NAVIGATION
- Log into MyBU Student.
- Upon landing at the MyBU Student Dashboard, click on the Expand/Collapse icon.
- The menu will expand.
- At any time, if the menu returns to its collapsed state, hover the cursor over an icon to view the menu name.
- The Home icon can be selected at any time to return to the Dashboard.
- When ready to logout, navigate to the bottom of the menu and find your name. Click your name or the drop down arrow.
- Click Logout.

ACCESSING THE ADDITIONAL FULL SITE
Some staff tasked with system operations will require navigation to another area of the student information system, referred to as the Full Site. This includes administrative groups such as Enrollment Services, Financial Aid, Admissions, Office of the Registrar, and Class Schedulers. If staff’s assigned homepage is the delivered Full Site, please skip to step #4. If the assigned homepage is the Dashboard, proceed with the following steps:
- To access the Full Site, log into MyBU Student.
- Upon landing at the MyBU Student Dashboard, click on the Expand/Collapse icon.
- Scroll to the end of the menu to find and click the Full Site item.

- The appropriate Staff Homepage will display.
- Navigate to the desired page. Please note that homepage displays and defaults will vary by user and job function.

NAVIGATING THE FULL SITE
It’s possible to be assigned one homepage or multiple homepages; this is dependent on role responsibilities.
- To view available homepages, click the dropdown menu in the top left corner and select the role needed:

- Alternatively, multiple homepages can be navigated to by clicking the arrows in the top right corner.
- Each homepage will have one or multiple tiles categorizing a set of functions. Click directly on the tile needed.
- A menu will display on the left side of the page; the central area of the page will display the menu item that is currently selected:
- Left menu: this is a preset list that can include pages, resources, and queries (reports):
- If the menu contains sections, click on arrow to collapse that section.
- Click on the menu item to open that item: it may open another screen if it’s an
external resource. - Clicking on the black tab will collapse the entire menu to the left and the page
selected will remain in the central area of the screen.
- To return the current homepage, click on that homepage name in the top left corner. To return to the default homepage, click on the home icon.

Remember, the available pages in the menu will depend on security permissions.
In addition to navigating through the homepage and subsequent menus, there are other system options that can be used to access menu pages. This includes Recently Visited, Favorites, and Search in Menu elements. The examples below use the icons in the top menu bar, however Recently Visited and Favorites can also be accessed from the menu that opens when clicking on the NavBar icon in the far right of the homepage.

- To view pages that have been accessed recently, select the Recently Visited (clock) icon from the top left of the homepage and the accessed pages will open.


FAVORITES
- To add a page to Favorites, first navigate to that page, and then click on the three dots menu in the top right corner. Select Add to Favorites.
- Before adding, a pop up will display allowing for the item to be re-labeled. Keep as is or edit as needed and click Add. A confirmation will appear once saved.
- To access the pages that have been added to favorites, click on the Favorites (heart) icon from the from the top left of the homepage and the favorited pages will open. The list can also be edited from here using the pencil icon.
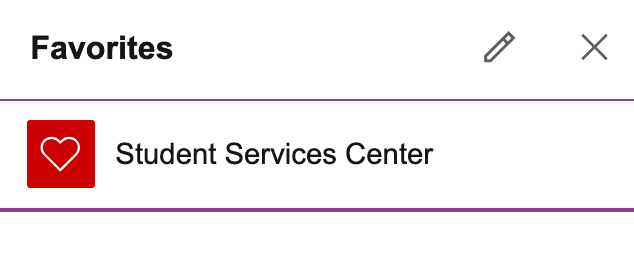
- Edit options are: ‘Delete Selected’ to remove a page that has been added to favorites, reorder how pages appear using the ‘Sequence number’, and re-label by editing the name of a page directly. Click Save.
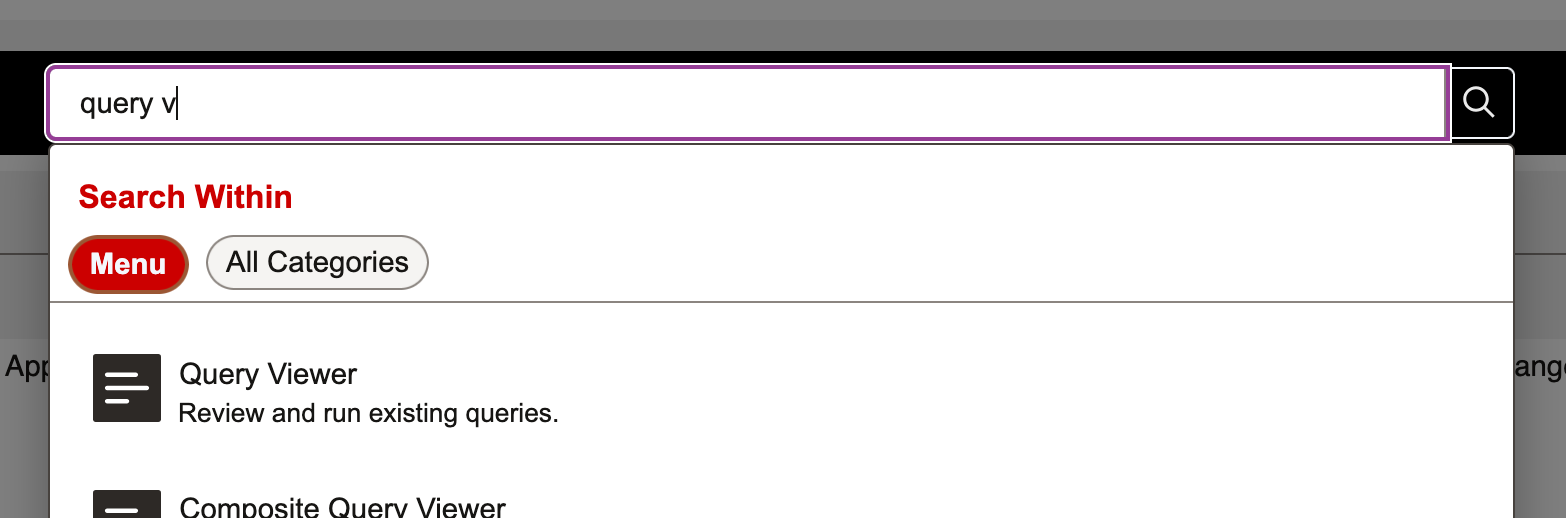
- Pages can also be accessed by using the menu search capability. From the homepage, simply enter the search terms and applicable options will appear. Pages can then be selected from search results.
- To log out of MyBU Student, click on the three dots menu in the top right corner. Select Sign Out.

OTHER TIPS
Click the Save button at the bottom of the page. Information entered into pages is NOT auto saved.
- Multiple system pages can be open at once for simpler referencing, if needed. The best way to open another page is while in one function, click on the New Window link from the three dots menu in the top right corner.
- MyBU Student pages will time out after 20 minutes of inactivity.
- Use the homepages, menus, pages, or tabs within pages, to navigate throughout various functions. Do not use the back button in the browser. Remember to click Save.
For some staff roles, some menu pages will not be accessed through a homepage, but rather through the NavBar icon in the top right corner. For more information on this type of navigation, please refer to the NavBar Menu Navigation section of the Appendix.
Administrative Staff: Additional Foundations
The following sections provide information for staff who may interact with pages that adhere to the Full Site structure; these may be pages accessed directly from the Full Site menu or embedded in the Dashboard menu. It details search options and working with effective dated rows.
SEARCH
SEARCH MODES
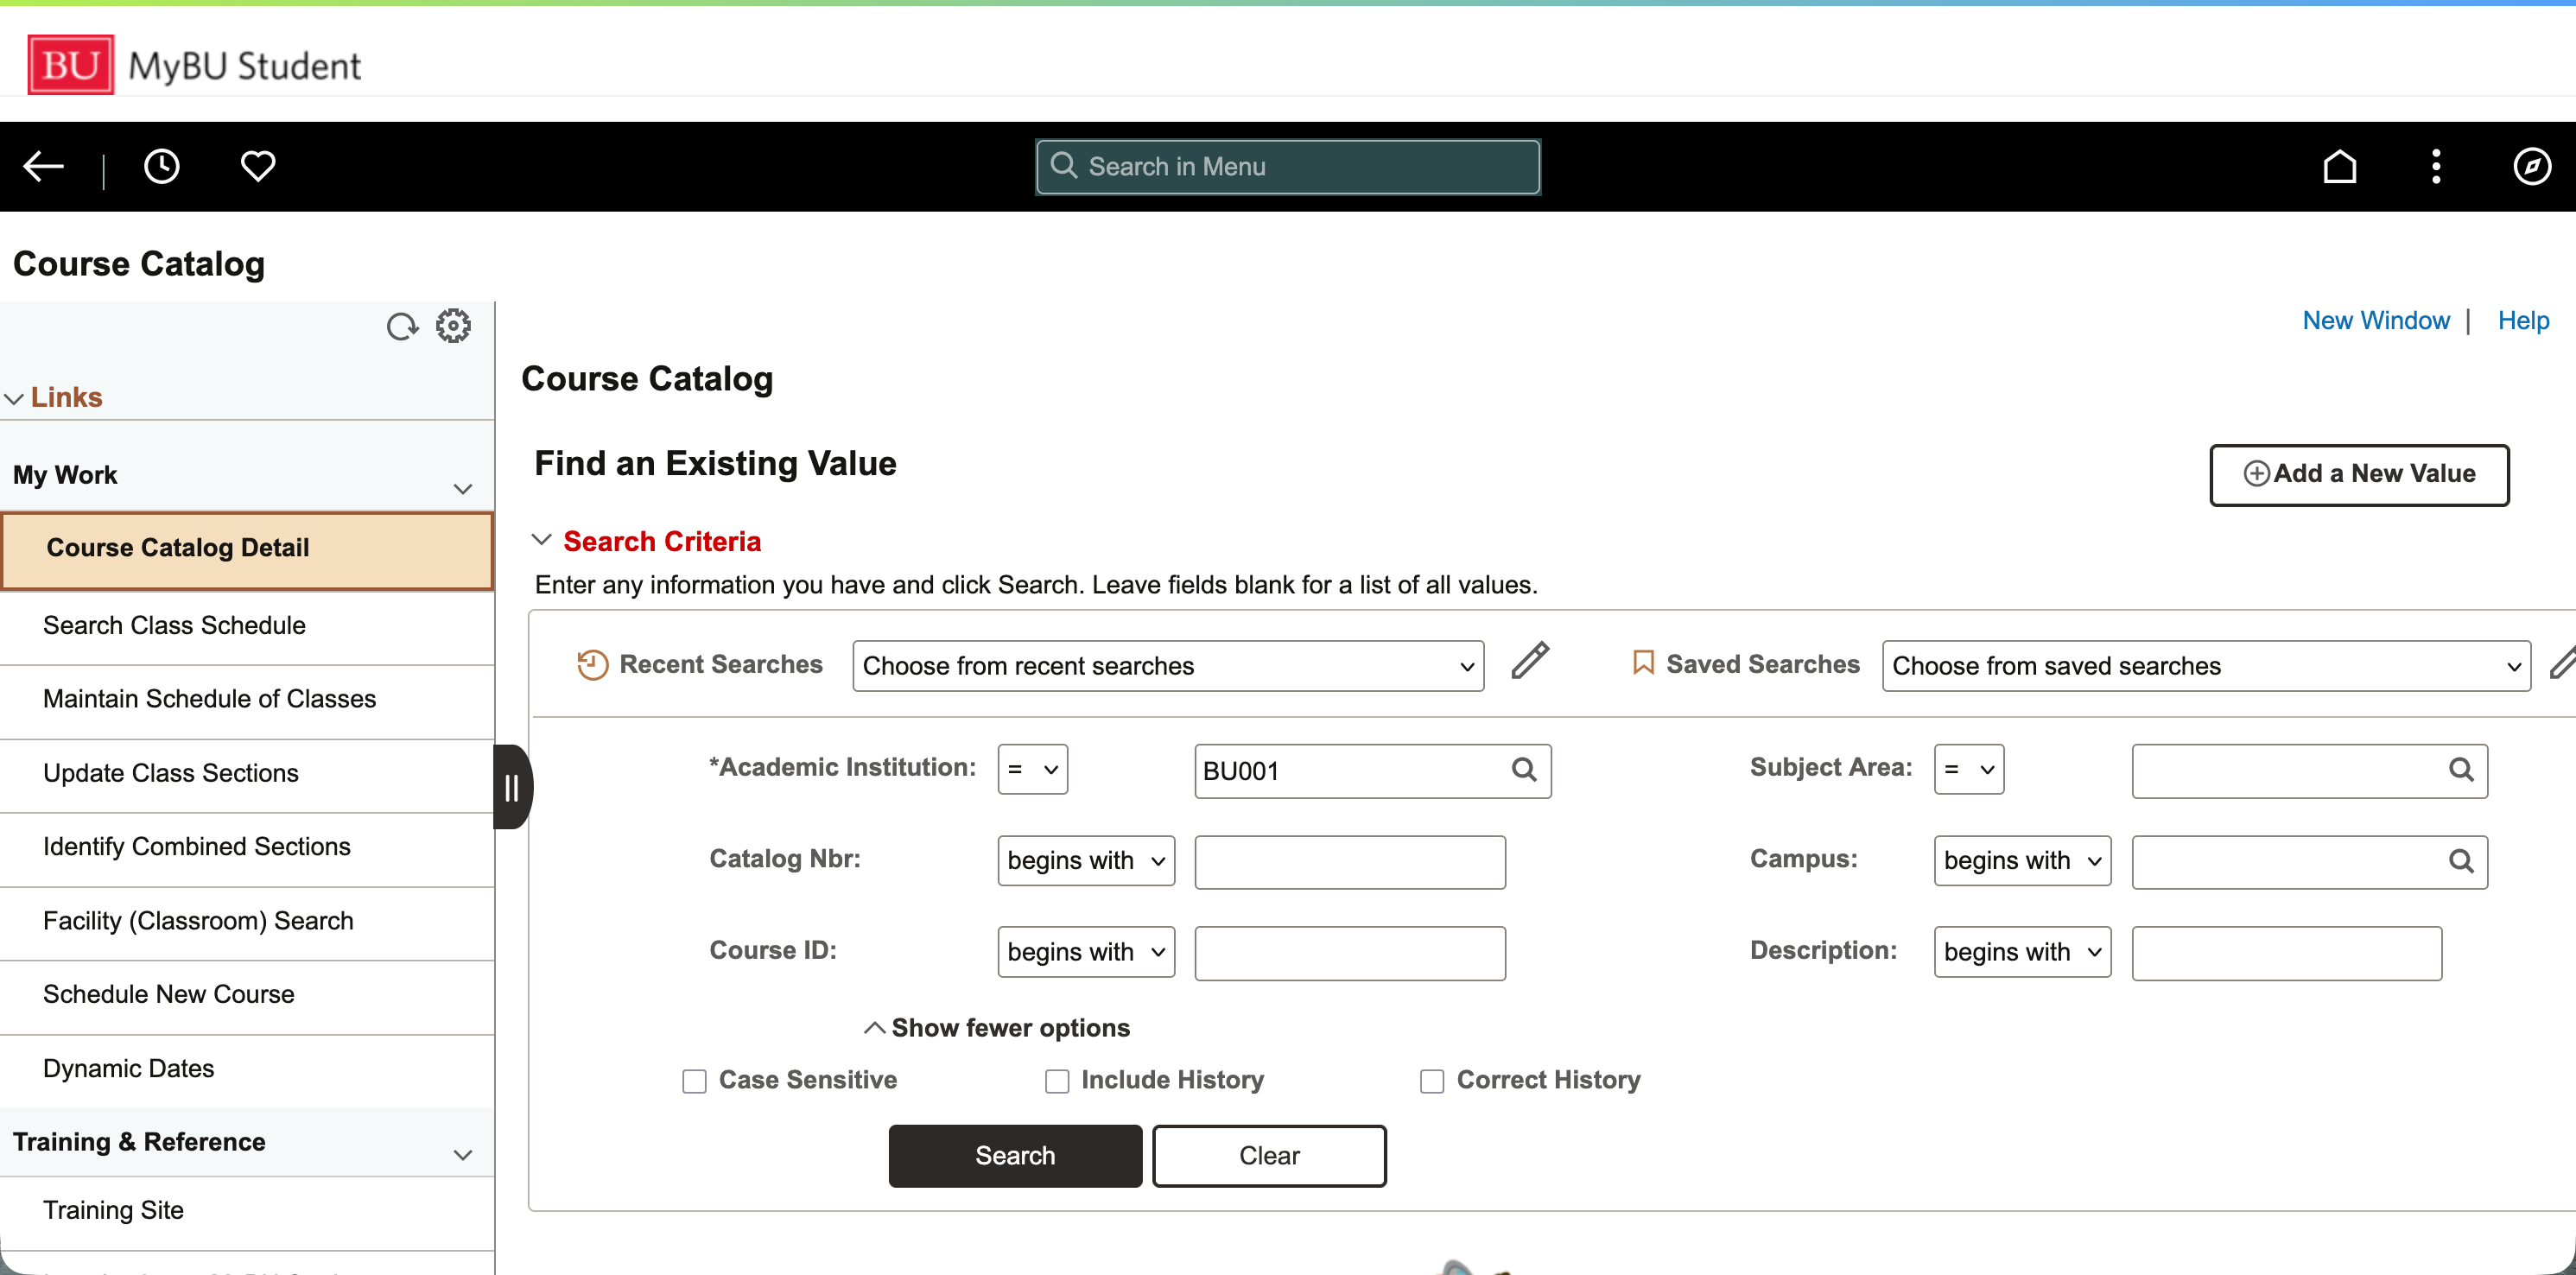
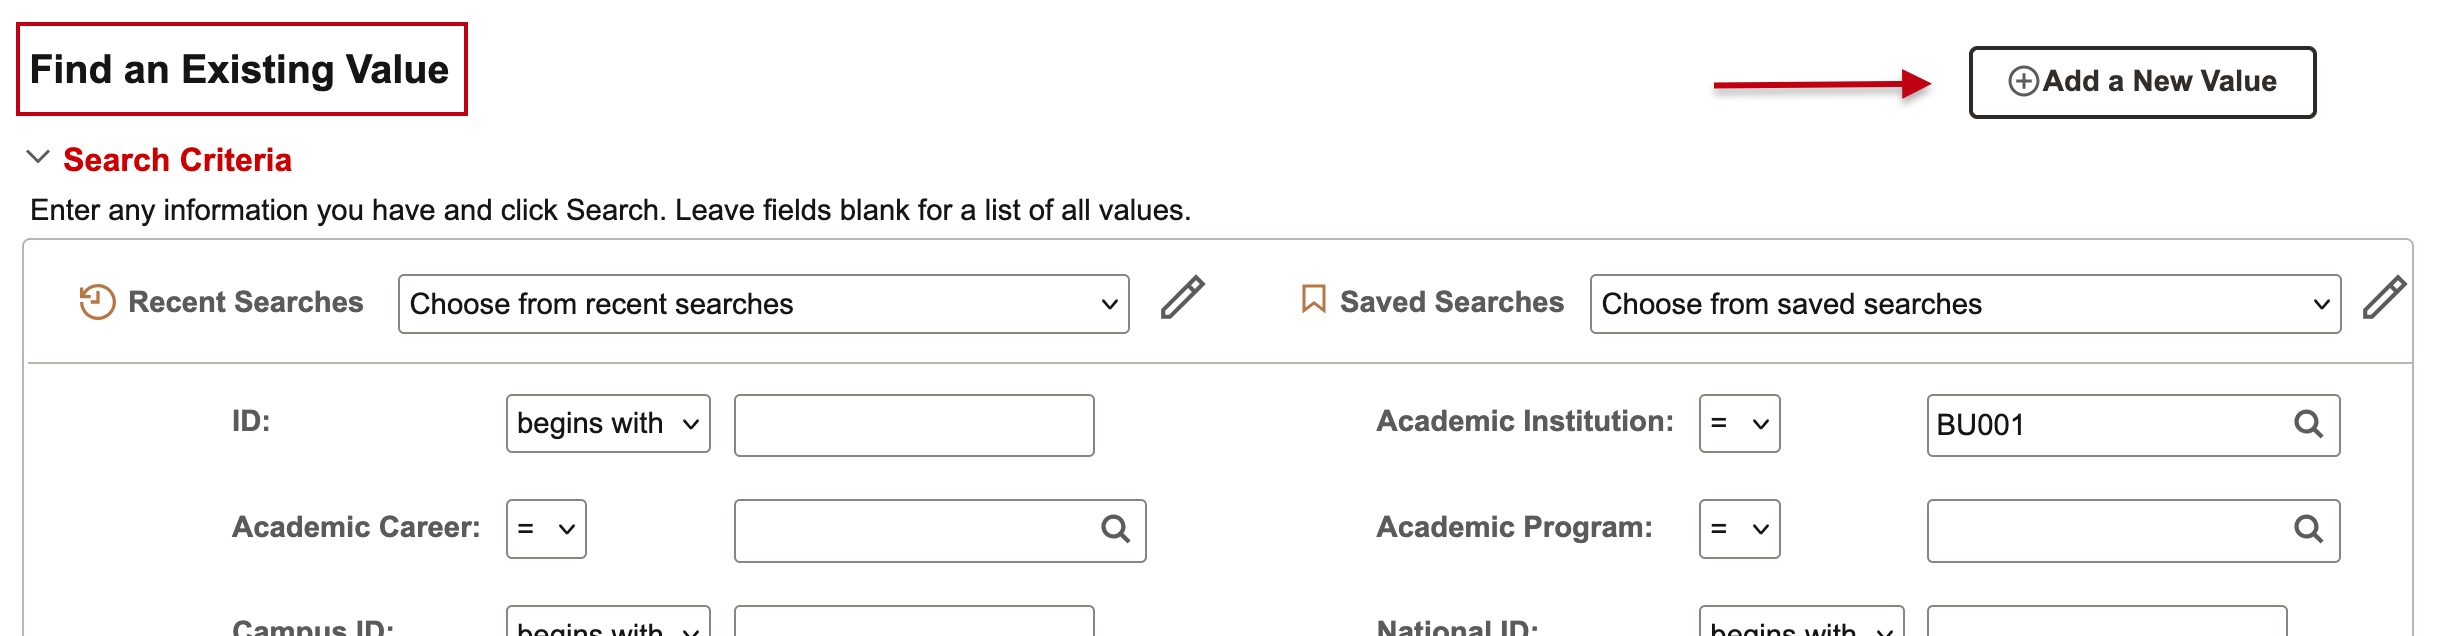
After navigating to the page needed, if applicable, it may display two options for searching, often defaulting to Find an Existing Value. A button to Add a New Value will display to the right. If selected, then the search fields related to adding a new value will display.
| Search Mode | Usage |
|---|---|
| Find an Existing Value |
Use to access a student’s data (view, delete, or update depending on security) within that table.
|
| Add a New Value |
Use if a student has NOT been accessed for the purpose of that particular function (the availability of this option is dependent on a user’s access level to update data).
|
ADVANCED AND BASIC SEARCHES
The search page will display the relevant fields for that function. There are typically two modes in which to search: Advanced and Basic. The system will often default to Advanced Search option.
- Advanced: offers several fields, allowing for a narrower search by entering more criteria.
- Basic: offers one or two fields to perform the search.
- Click on the Advanced or Basic link below the fields to toggle between the two modes.
SEARCH CRITERIA
The available search fields will be dependent on the page being accessed, however there are some concepts that apply to all data searches:
- Academic Institution will always be BU001. This field is always required.
- Term convention: Ex., 2258 = Fall ‘25
- First digit (2) = current millennium two Middle two digits (25) = year
- Last digit (8) = term
- Spring = 1, Summer = 5, Fall = 8
| System Concept | Definition/Equivalent |
|---|---|
| ID |
System identifier; (commonly referred to as the EMPLID)
|
| Campus ID |
BUID:
|
The EMPLID and Campus ID will appear as two separate fields within the MyBU Student, however the EMPLID will match the BUID.
A student’s BUID may carry over from a page that was just accessed to the search page of the next function being opened.
- This can be helpful if multiple functions are being used for the same student. However, keep this in mind if moving onto a different student.
- Use the Clear button to easily remove all field values.
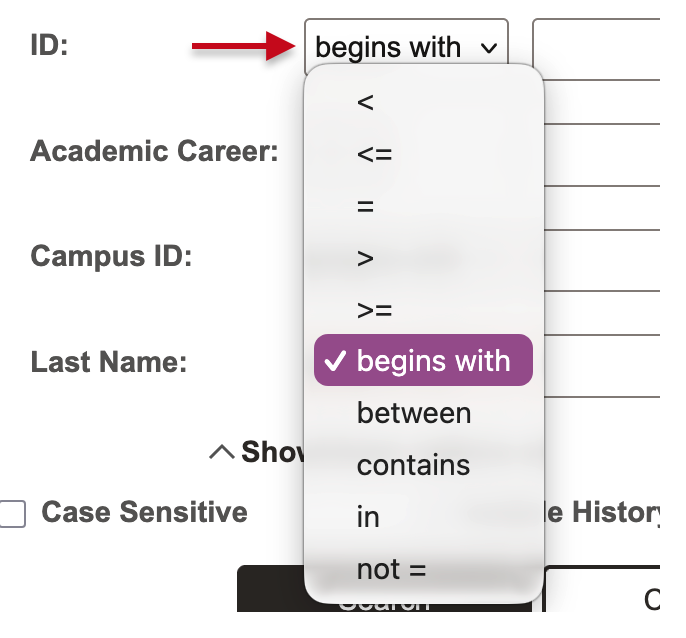
Fields also allow for the selection of a specific operation, such as contains or is equal (=) to, in order to define how the system should be searching for the entered value(s):
Some fields link to a table with pre-defined values; these fields are identified with the lookup icon.
- A value can be entered in those fields, or a lookup can be performed without entering a value. Upon clicking, the stored options will display. Click the result to insert into the field.
- Remember, the values that display may vary depending on a user’s access security permissions.

For more information on how these concepts function with effective dated rows, please refer to the Data Rows and Effective Dates section of this resource.
Many search pages contain the options to Include History or Correct History:
- No selection: displays Current row.
- Include History displays all rows of an existing record. History, Current, and Future rows will be displayed in chronological order.
- Correct History: displays all rows of an existing record for the purposes of editing current and historical data. Access to this function depends on security permissions.
- These options are not required to conduct the search and can be selected again after a result is chosen.

Depending on the search criteria entered, a specific record will open in the relevant page. Or a search results list will display below the search criteria and can return up to 100 entries. If the system needs some time to search, a spinning processing icon will display while this is performed.
- If search criteria meet more than 100 entries, only the first 100 will appear. Try narrowing the criteria entered to find the record needed.
- Use the arrows to scroll, or click the numbers dropdown, to view additional results.
- Click the View All button to see all results on the page.
- Click the result to enter into that record.

If the incorrect record is selected, use the Return to Search button at the bottom of the page (do not use the browser’s back button).
DATA ROWS AND EFFECTIVE DATES
Helpful definitions for this section:
| System Concept | Definition |
|---|---|
| Data Row |
A single record or instance of information, often representing a new action or event. Ex., a new row is added when a student changes their program. Rows function in concert with effective dating.
|
| Effective Date |
The date at which a piece of data is considered official or effective. The system uses effective dates to maintain a historical record of past data. Instead of deleting or overriding data, a new set of data is entered with a new effective date, which tells the system to use the new information from that date forward. |
RELATIONSHIP OF CONCEPTS
Effective dating allows storage of historical data, a view of changes in data over time, and entry of data for future periods. It’s important to track several events in the career of a student, for example, when they applied, when they accepted an offer of admission, when they added a minor, and when they graduated.
By inserting rows of data instead of changing data on an existing row, a student’s institutional history is built and available for reference. When new information is entered in this way, previous data is not lost or overwritten. To retain the accurate history, a data row is added and associated to the date when the information goes into effect: the Effective Date.
WORKING WITH ROWS
The following information is for pages that include data rows.
The number of data rows is indicated by the information in the top right corner of the box storing the data rows.
- Reminder: this could be impacted by security permissions, and whether the Include History option is selected when searching. Refer to the Search section of this resource for more information.
- To see the other data rows individually, use the arrows to navigate to the next row.
- To see all the rows expanded on the page, select View All.
- To return to viewing one row, select View 1.
- To search for a particular value, select magnifying glass icon.

If a new event or action is needed, it is necessary to add a row to input additional information into MyBU Student.
Remember to add a row in the case of new information, do not overwrite data in existing rows in this case. This allows for an accurate record of historical events. Ensure the proper effective date is entered.
To add a row:
- Click the plus icon.
- Enter the relevant data.
- Click the Save button at the bottom of the page:
- Information entered is NOT auto saved.
Appendix
NAVBAR MENU NAVIGATION
This section explains NavBar Menu navigation of the Full Site.
- Upon logging in, click on the Navigator icon in the top right to access available menus.
- Menu options will appear in the sliding right sidebar after clicking the Nav icon.
- To view all available menus and pages, select Menu.
Menus and pages are organized in a file format; multiple folder levels may need to be stepped through to access the function needed.

- The menu list can be customized by clicking on the gear icon in the top right of the menu slideout:
- The Menu Order can be sorted alphabetically or by the standard system order.
- The default tiles will be Recently Visited, Favorites, and Menu. This can be changed by clicking the plus button.
- Save any changes.
Page last updated February 2026. For a PDF copy, print this webpage as a PDF. Other resource formats can also be accessed via the relevant icons below.
![]()
![]()