Email Class Roster
To email students from the Class Roster:
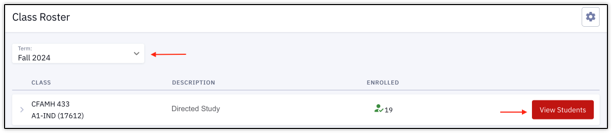
- Navigate to Dashboard > Class Roster.
- Ensure the desired Term is selected.
- Find the desired class and click View Students.
- Click Email Enrolled to open a blank email with all currently enrolled students already populated in the “To” field.

- Change the Status field from Enrolled to Waitlisted, Dropped, or All to email those specific students.

- To email specific, selected students, click the checkbox on the applicable student(s) row(s), click the Email button, and choose Selected from the dropdown.

- Change the Status field from Enrolled to Waitlisted, Dropped, or All to email those specific students.
- Proceed with writing and sending your email message.


NOTE:The email feature will open the email service that is the default on the device being used. If no email application is installed:
 Download the class roster by clicking the Download icon at the top of the Class Roster page.
- Find and open the downloaded spreadsheet.
- Copy the emails from the Email Address column and paste them into your webmail application. Proceed with writing and sending your email message.
For more information, visit the Class Roster resource.
This page was last updated April 2026. To download a PDF copy of this resource, print this webpage as a PDF.
![]()