Advisors: Degree Progress & What-If
This information covers the Degree Progress and What-If Reports from the advisor perspective. MyBU Student Degree Progress presents the requirements of a student’s Degree Progress Report, including what has or has not been satisfied. The What-If function allows for the review of Degree Progress details for alternative programs, plans, or other scenarios.
![]()
![]()
Introduction
In Degree Progress, advisors can browse a student’s set of requirements and see what is satisfied and what is not satisfied (this is similar to the Degree Advice function in the Legacy Student Link). Drilling down to the course lists for requirements, advisors can view course and section details.
The What-If Report allows for the view of the same information provided with Degree Progress page, but for a different Career/Program/Plan Scenario and/or with additional courses completed. In other words, it’s a tool that generates a hypothetical Degree Progress report if the student were to complete courses or change their Program/Plan.
⚠︎ Screen options and menus will vary by user; please note that displays may differ for you based on access that has been granted.
All screens shown are for training purposes only.
Act As Student
The Act As function allows advisors to view student information similarly to how a student would view their information. This includes Degree Progress.
- There may be some differences in activities that can be performed by a student and by an advisor in the Act As mode.
For information related to using Act As for other functions, please refer to the Act as Student resource.
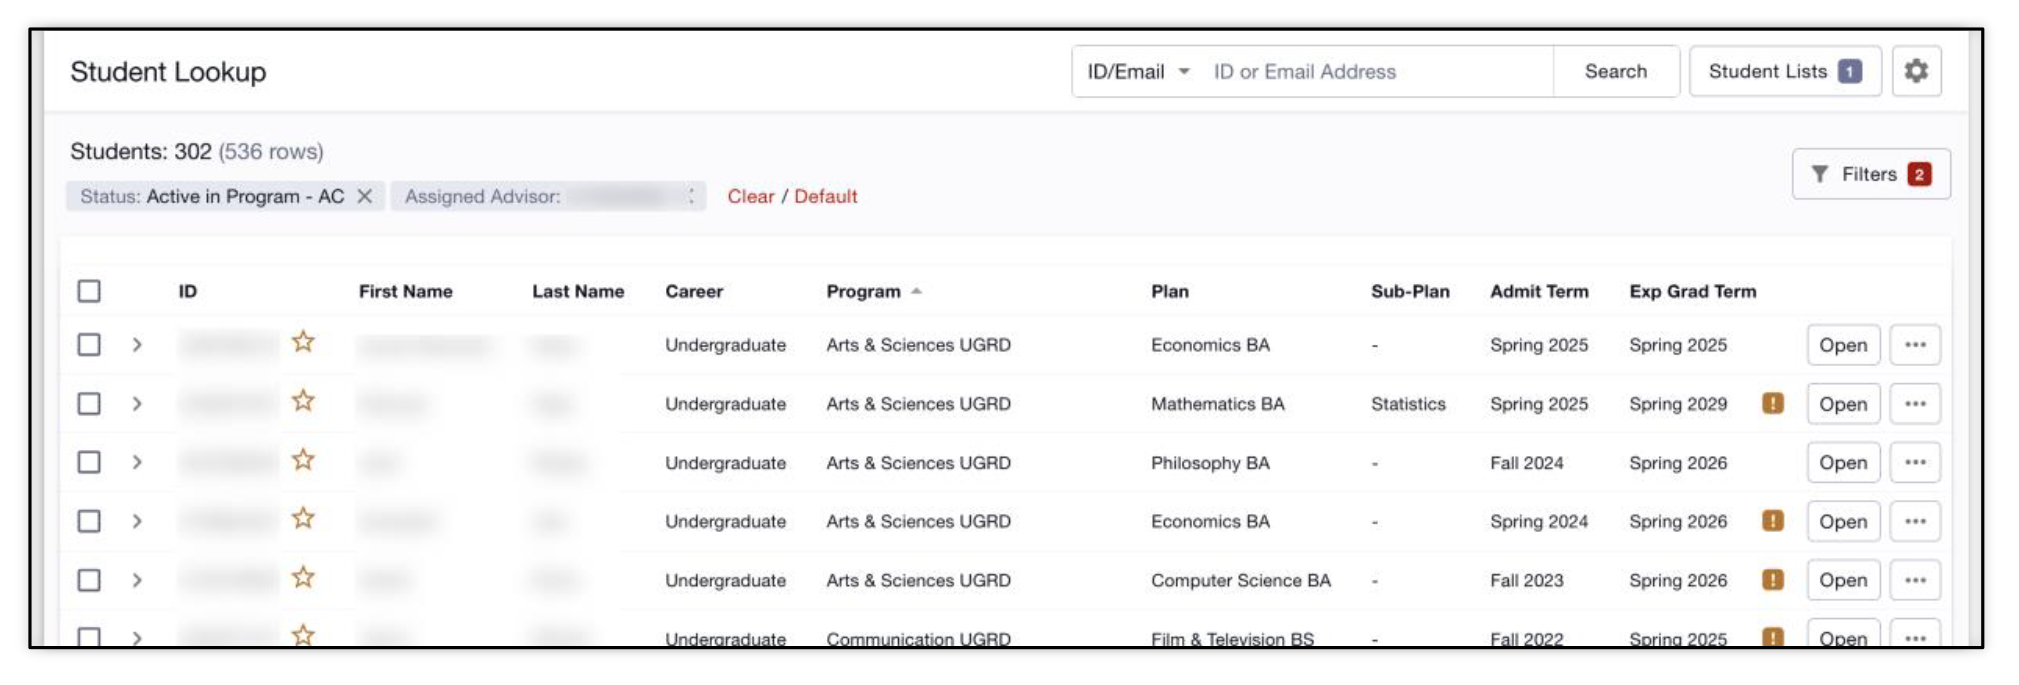
NAVIGATION TO ACT AS FUNCTION
-
- Use the Dashboard widget or go to the left menu and select Advisor, then Advisee & Student Lookup.
- If the desired student is appearing in the Dashboard My Advisees widget, then clicking the Act As button can be performed from here.
- Otherwise, clicking on the View More link from the My Advisees widget on the Dashboard will open the Advisee & Student Lookup page. Navigating from the left menu will also open the page.
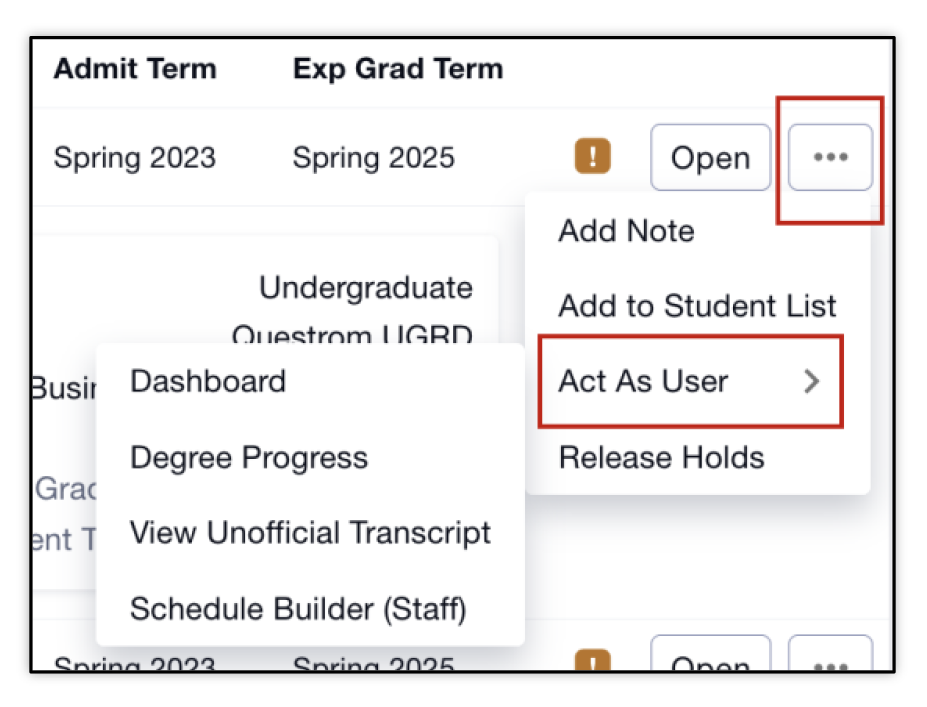
- From the Advisees & Student Lookup page, click on the 3 horizontal dots to open the menu. Select Act as User.
- Choose to launch to the student’s Dashboard, Degree Progress, View Unofficial Transcript, or Schedule Builder page.
-
- Degree Progress will open automatically if the Degree Progress selection is clicked. It can still be accessed if selecting the Dashboard or Schedule Builder options.

-
- Acknowledge the Family Educational Rights and Privacy Act (FERPA) message by clicking Continue. Visit the BU Registrar’s website to learn more about FERPA.
The desired page will open. Navigation to other pages while Acting as that student is available via the left menu.
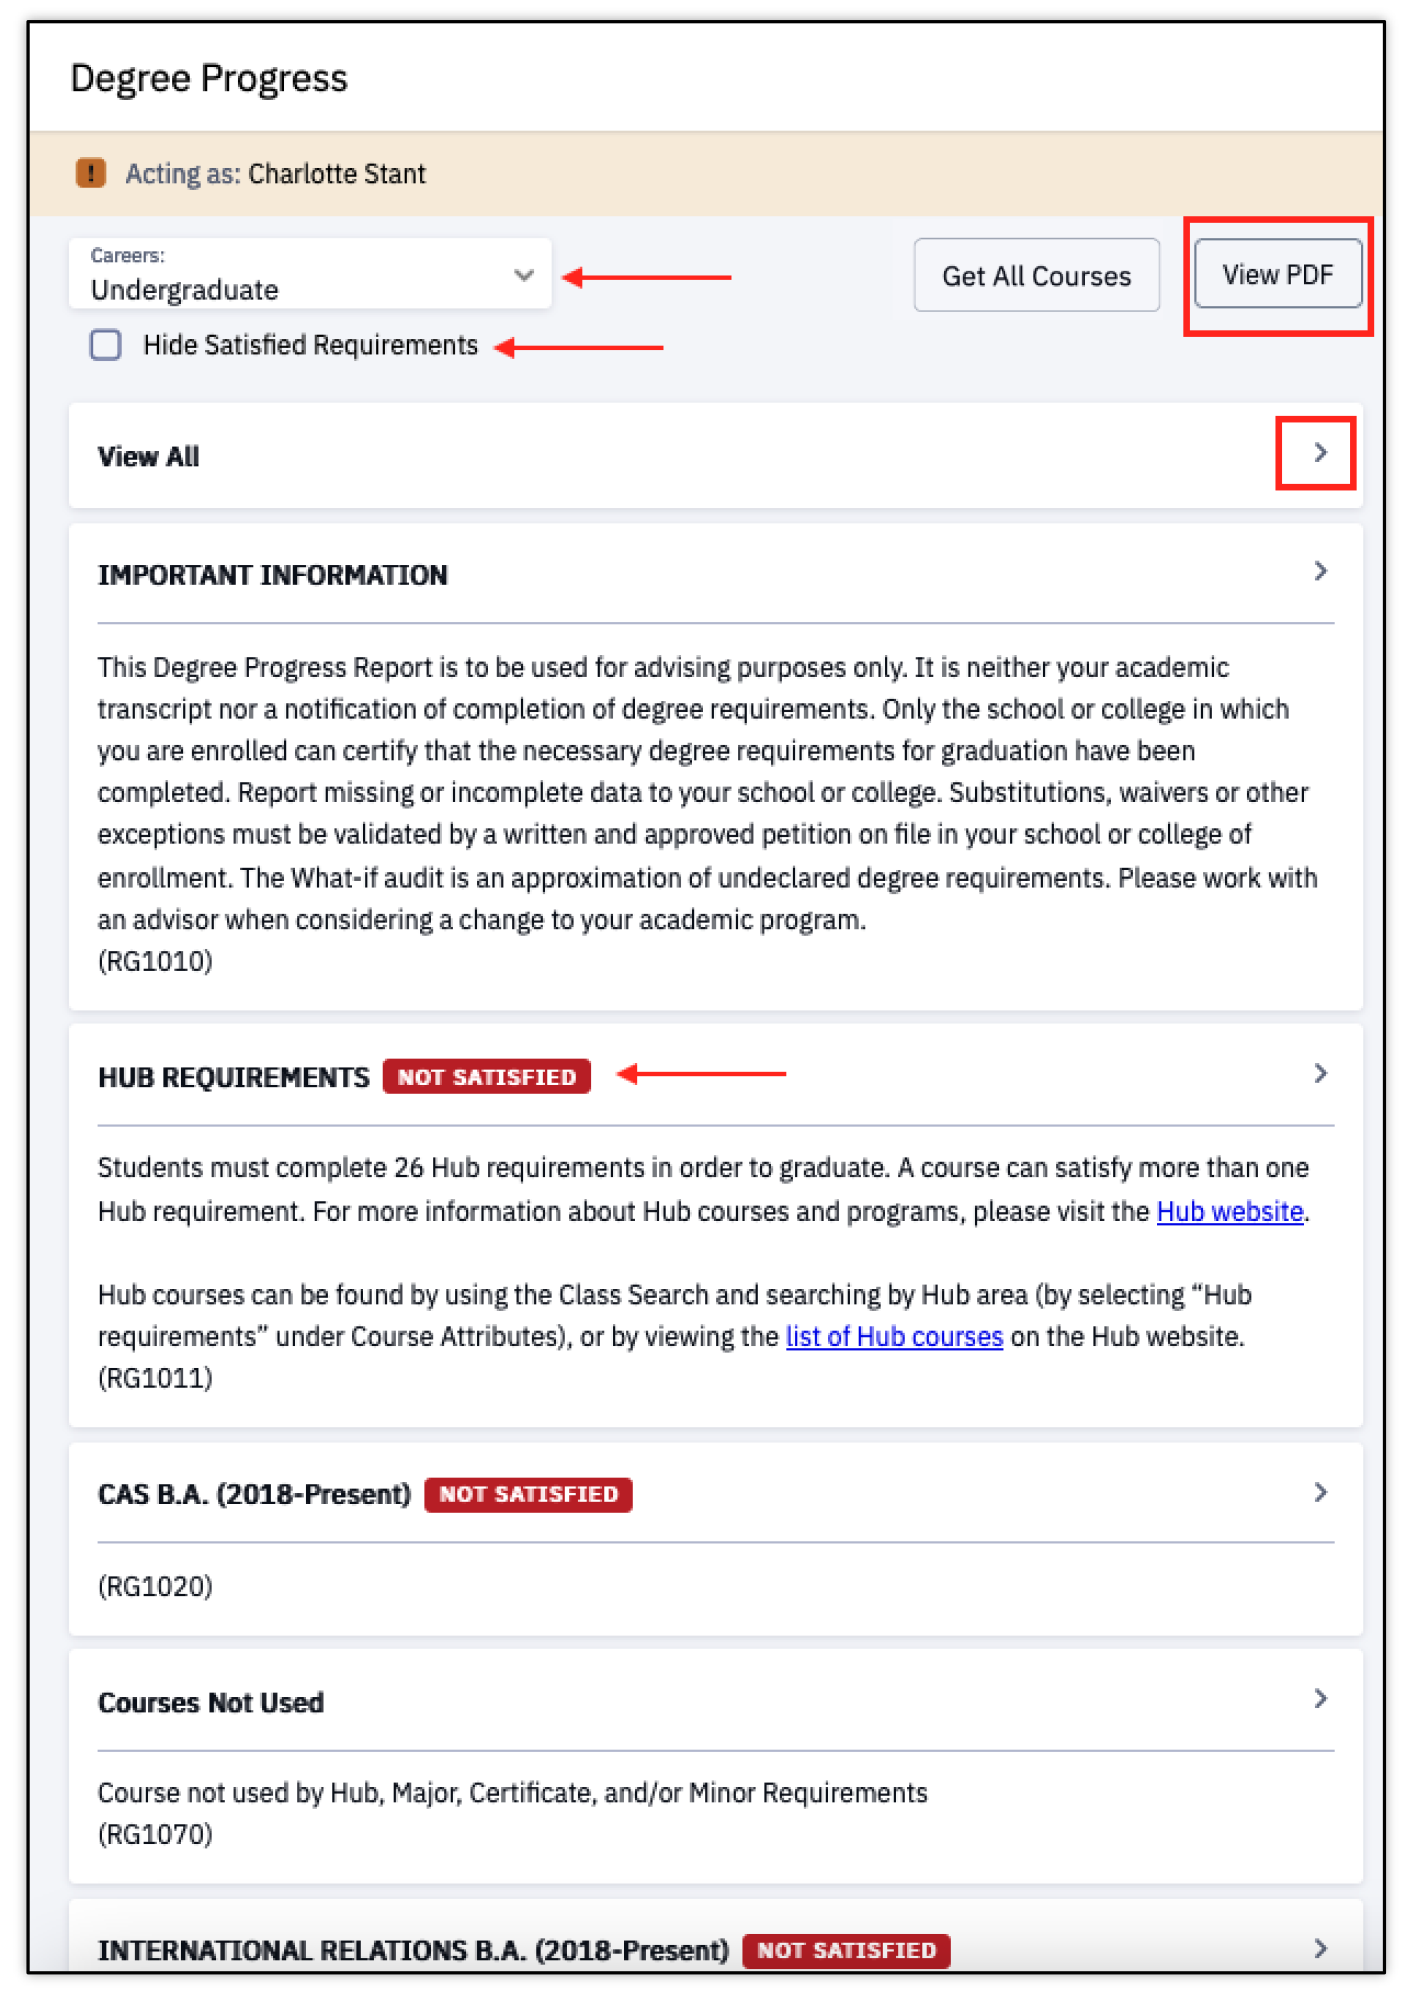
- Notice the Acting As banner at the top of the page.

- Choose to launch to the student’s Dashboard, Degree Progress, View Unofficial Transcript, or Schedule Builder page.

- Use the Dashboard widget or go to the left menu and select Advisor, then Advisee & Student Lookup.

Degree Progress
The Degree Progress Report provides a comprehensive overview of a student’s degree requirements. It includes course lists and available sections for requirements and identifies what’s been satisfied vs not satisfied.
NAVIGATION
Degree Progress for a student requires the use of the Act As function for Advisors to view. This can most easily be accessed through My Advisees widget on the Dashboard. Or through the Advisor menu.
- If on the Dashboard or another page while in Act As mode for the student, navigate to Academics > Degree Progress in the left menu.
- If the Degree Progress page was selected when entering the Act As mode, it will open automatically.
The Degree Progress Report displays.

UNDERSTANDING DEGREE PROGRESS PAGE
Review the Degree Progress Requirements.
- If there are multiple active Careers, use the Career drop down to select and view other Career Degree Progress Reports.
- Click the checkbox next to the Hide Satisfied Requirements option to only view requirements that have not yet been completed.
- The Get All Courses button allows for the view of all courses expanded in the right pane. Specific steps do need to be followed to achieve this view, so please refer to the Get All Courses section below for instructions.
- Select the View PDF button to view in browser, print, or download the Degree Progress Report.
- Select the Arrow ‘>’ to view details for that requirement. This will open additional requirement details on the right side.
- The View All option will list all requirements.
- Notice the labels indicating the Not Satisfied/Satisfied status.
There will be multiple requirement levels within the report.
- The list on the left side will be organized by Requirement Group (RG).
- Clicking on a group will launch the specific Requirement (RQ) on the right side.
- Expanding that requirement will display the course(s) available, or the Requirement Line (LN).
- The Not Satisfied/Satisfied status will continue to display as each level is expanded.
- Courses register for will display as yellow and In Progress.

If there are multiple course Requirements as part of a Requirement Group, a progress summary will display above the requirement list on the right side.
- Each requirement can be expanded by clicking the Arrow ‘>’, or the Expand buttons.
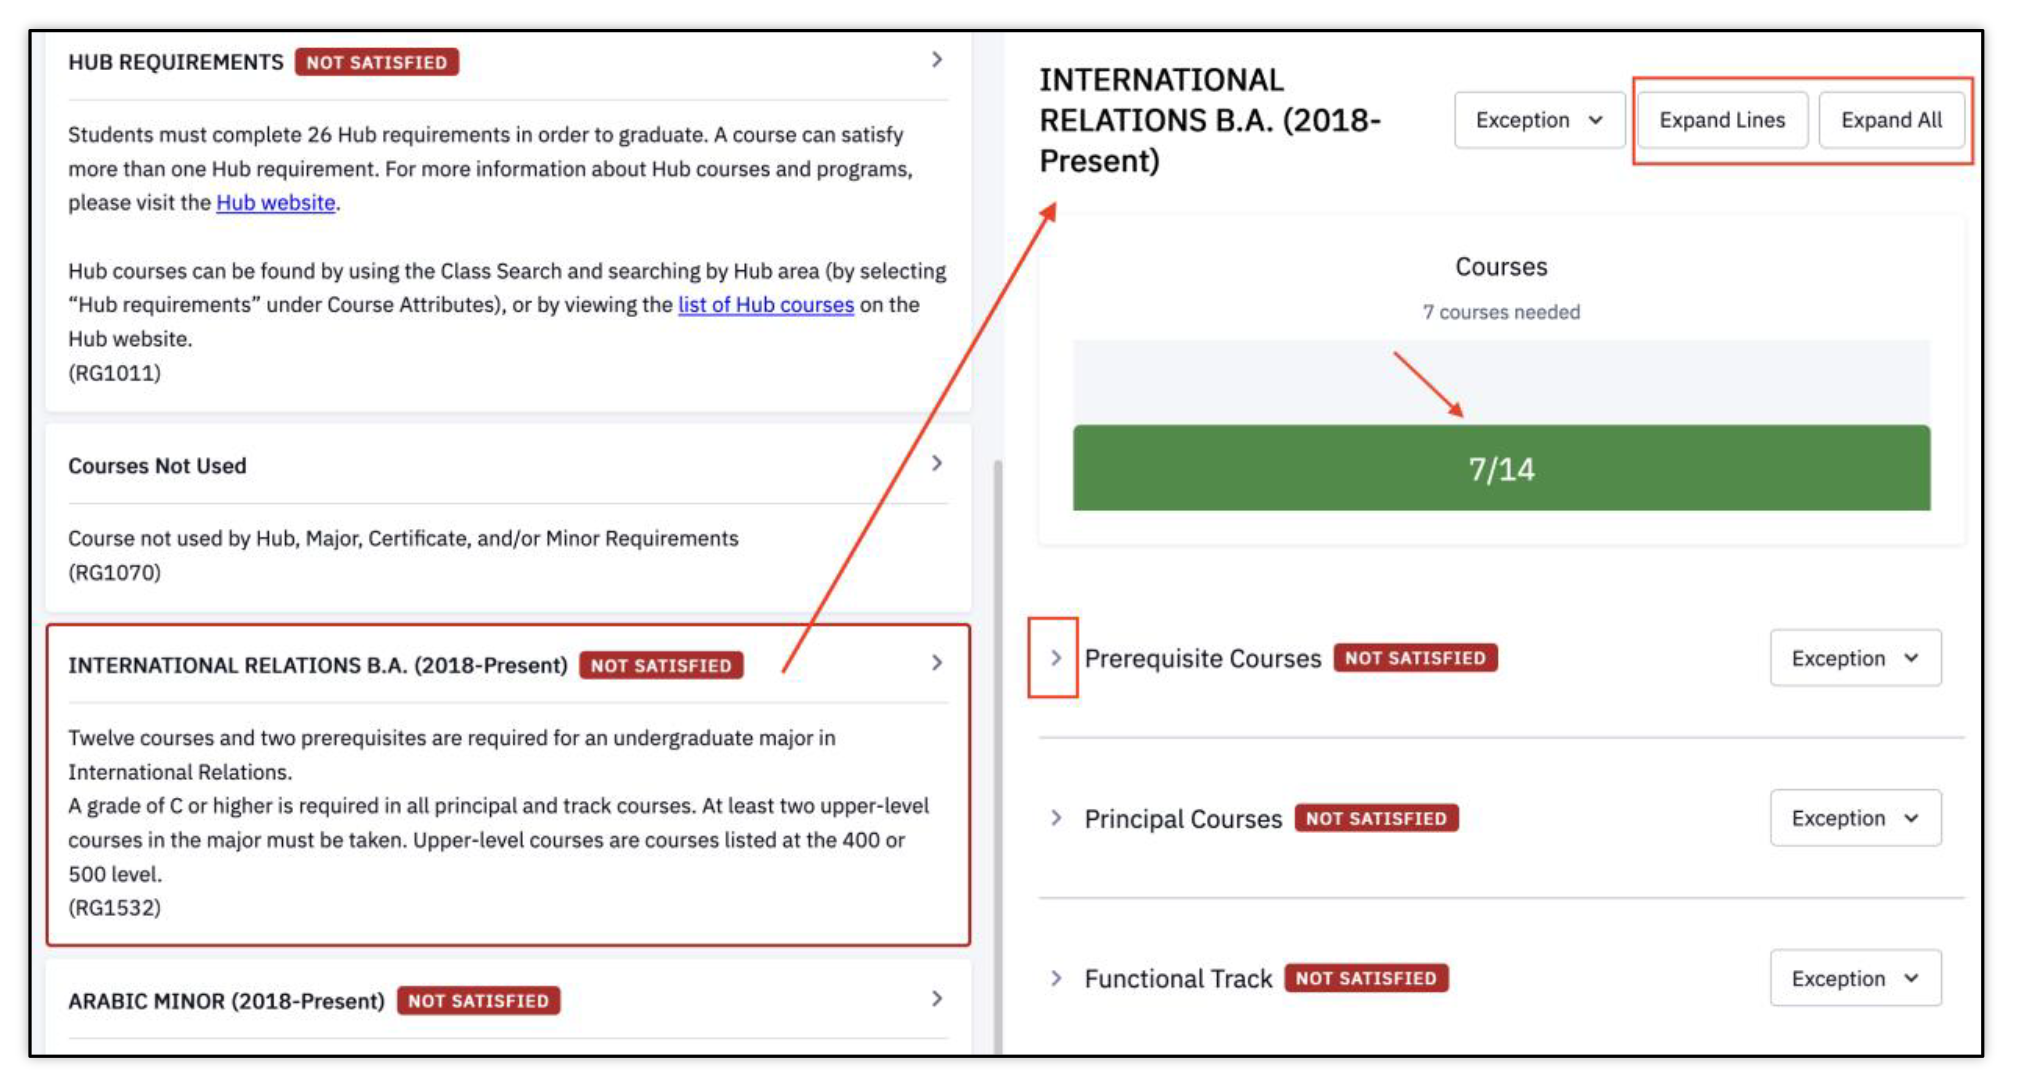
To view courses that can, or did, satisfy the individual requirement, click View Courses.
- Refer to the Get All Courses section below for the view that allows all courses to display expanded in the right pane.
Course details will display in a new window.

When looking at requirements that have not yet been satisfied, courses and sections can be viewed that will count toward that requirement.Sections will only display if they have been scheduled.
TIP! Students can add classes from Degree Progress to their Schedule Builder or Shopping Cart. This action cannot be taken as an advisor using the Act As mode.
Navigation Tip: To move back to prior pages, use the navigation at the top of the page.
- Clicking the breadcrumbs allows for the selection of the specific Degree Progress page or click the Degree Progress link directly to go back to the main Degree Progress Report page.

GET ALL COURSES
The Get All Courses function is a way to view course details for satisfied courses across all requirements in this Degree Progress window. Alternatively, clicking the View Courses button on any of the requirements will display the course details for that individual requirement in a new window.
-
- Click View All or a requirement group (major or minor). Notice the requirements display in the right pane; all details are collapsed.
- Click the Expand All button.
- Click the Expand Lines button.
- Click on the Get All Courses button in the left pane.
This expands the sections of the requirement group, listing the specific requirement lines.

Notice that the expanded requirements in the right pane now display the course(s) counting towards the requirement group (major or minor).

This is an alternative way of viewing course details in this one window. Clicking the View Courses button on any of the requirements will display the course details for that individual requirement in a new window. Those steps are noted in the Understanding Degree Progress section above.


VIEWING STUDENT EXCEPTIONS
Student Exceptions allow for course requirement modifications for an individual student. Advisors may view exceptions that have been granted. The four major exception types are:
- Requirement Waiver: waives (remove/eliminate) a specific existing requirement. An example would be waiving the second language requirement a CAS student whose first language is not English but their secondary school language of instruction was English.
- Requirement Change: changes the number of Units for a Course or a specific requirement level.
- Course Directives – Substitute: override a specific course to satisfy a requirement. A course can be substituted or redirected from ‘Additional Courses’ to satisfy a major requirement.
- Course Directives – Exclude: override a specific course to satisfy a requirement. A course can be excluded from being used to satisfy electives.
ⓘNOTE: Only certain designated personnel within each School & College are able make and enter exceptions. Please refer to your School/College’s policies or Dean’s office for more information
If an exception has been added to a requirement, it will be indicated with a noted status and comment.
- This does not apply to the Course Directive – Exclude type. A course excluded would not appear in the list of courses.
Requirement Waiver Example:

Note: the ‘Reason for Requirement waiver’ text is where the reason and context entered will display; this language is for example purposes.
Requirement Change Example:

Course Directive – Substitute Example:

What-If
The What-If Report allows for the view of the same information provided with Degree Progress page, but for a different Career/Program/Plan Scenario and/or with additional courses completed. It’s a tool that generates a hypothetical Degree Progress report if the student were to complete courses or change their Program/Plan.
NAVIGATION
The What-If Report for a student requires the use of the Act As function for the Advisor to view. This can most easily be accessed through My Advisees widget on the Dashboard. Or through the Advisor menu.
- In the Act As mode for the student, navigate to Academics > What-If in the left menu.
It’s possible there may be no What-If Reports that have been generated. If there are previous reports, they will be listed here with overview information. Note: only students and their assigned advisors can create What-If Reports. The ability for non-advisors to add What-If reports may come in a future update.
- Click Create Report to begin.
-
-
-
-
- Select a Career.
- Select a Term for the What-If Career.
-
-
-
-
-
-
-
- Select a Program.
- Select a Program Requirement Term.
- he Requirement Term is associated with the catalog year. It determines degree requirements or conditions that must be fulfilled by a student.
- Select a Plan Type.
- Select a Plan.
- Select a Sub-Plan if applicable.
- Select a Plan Requirement Term.
- Multiple scenarios can be added here. If desired, click the Add Scenario button.
- Another set of Program, Plan, and Term fields will be inserted; fill is an appropriate.
- If there is more than one What-If scenario, and it includes blank required fields, be sure to select the Trash/Delete icon. An error will be returned if the required fields are blank upon submission.

-
-
-
- Enter or select a Subject.
- Enter or select a Course from the Catalog Number dropdown menu
- Select the Add Course button.
- Select an anticipated Term.
- Select an anticipated Grade.
- To insert additional Course Scenarios, continue adding a Subject, Course, Term, and Grade – using the Add Course button.
- To delete a set of course information, click the Trash/Delete icon.
- When the desired information has been entered in the Program and/or Course Scenario sections, click the Submit Report button.

Begin to enter the criteria for the desired What-If scenario. A Degree Progress Report will generate based on the details entered in these scenario fields.

CAREER SCENARIO
The student’s program and plan information may default into the next set of fields.
PROGRAM SCENARIO
Using the Program Scenario fields creates a What-If report identifying what Degree Progress would look like if the student were to enter into a different program or plan.
Be sure to enter values in the required fields (indicated with an asterisk*).


What-If scenario(s) can be submitted at this time without entering Course Scenario details, or proceed to the next step to enter a Course Scenario.
COURSE SCENARIO
Using the Course Scenario fields creates a What-If report identifying what Degree Progress would look like if one or more courses were completed.

The Degree Progress Report will generate to reflect the What-If scenarios entered.

If multiple Program or Course scenarios were entered in the What-If page, they will all be listed in the Degree Progress Report that generates. Proceed with reviewing the requirements. For more information on understanding Degree Progress details, please refer to the Degree Progress section of this guide.
To return to the What-If page, click the What-If link at the top of the Degree Progress report. The first page of the What-If page will display. More scenarios can be generated by clicking the Create Report button and following the steps above.
To review the existing What-If reports, click the View Report button.

Page last updated March 2026. For a PDF copy, print this webpage as a PDF. Other resource formats can also be accessed via the relevant icons below.